Monday, December 7, 2020

Configure vendor rebates in Microsoft Dynamics 365 F&SCM

A vendor rebate is a type of vendor allowance or incentive in which a part of the purchase price is returned by the seller(vendor) to the buyer(company) when a specified quantity or value of goods has been purchased within a specified period.


Business scenario:  

A company qualifies for a monetary reward in return for achieving preset purchase targets. Payment terms are monthly based on the recorded purchase invoices. 

Walkthrough:

First off all, you will need to create a contract 

Create new Vendor rebate agreement (Procurement and sourcing > Vendor rebates > Rebate agreements)

In the Cumulate purchase by field select Invoice to calculate the rebate amount every time that a purchase order line is invoiced

In the Approval required option set to No, since we don't want a owner approve the rebate claims before a rebate can be accrued or paid out.

Set the Accrual account and Expense account fields that will receive accrued amounts during the intermediate stage between approval and processing.

Under Line tab in the lower part of the page select the products that qualify for a rebate program.

In the Rebate line break type field select the Quantity. Enter 1 in the From value field and 3 in the To value field. In this case, the rebate amount applies when you purchase one or two items, but not when you purchase three items.

Click Validation button to validate the agreement. After validation agreement would be closed for editing. 

Note: If you need to change the agreement, click Validation button and check Remove validation flag. It will work if you don't have unprocessed claims. 

The next steps is to buy products that qualify for a rebate program and generate a claim.

Create new Purchase order

Add line that was added to the Vendor rebate agreement

Click Purchase order line > View > Price details > Rebate FastTab to see rebate amount

Note: If you cannot see Price details option, navigate to Procurement and sourcing parameters page, on the Prices tab, on the Price details FastTab, set the Enable price details option to Yes.

Once purchase order is invoiced, royalty claim will be generated.

To view all the claims, select Procurement and sourcing > Vendor Rebates > Rebate claims.

If Approval required option was set to No, rebate claim will be automatically processed (status is Completed), a vendor invoice for the rebate amount will be created and posted. As a result, the vendor's payable account is debited, and the Purchase expenditure for expense account for the category defined in the parameters is credited.

If Approval required option was set to Yes, rebate claim will NOT be automatically processed. A/P clerk must complete the rebate claim. On the Rebate claims page, on the Action Pane, A/P clerk needs to select Approve and then Process buttons. The following events occur upon process:

- the claim's status is changed to Completed:

- A Rebate accrual journal posting has reversed the previous interim amounts on the accrual and expense accounts.

- A vendor invoice (credit note) for the rebate amount has been created. the vendor's Payable account is debited, and the Discounts and Allowances received account is credited

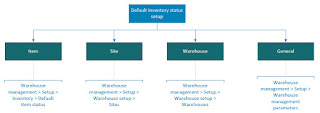
How to setup a default inventory status in Microsoft Dynamics 365 F&SCM

How to setup a default inventory status in Microsoft Dynamics 365 F&SCM

Inventory status can be categorized as available or unavailable. You can use the inventory blocking parameter to block items with an unavailable inventory status. Items with a blocked status are considered physical inventory and cannot be used in a production order, sales order, transfer order, or outbound transaction.

After you have set up an inventory status you can set the default inventory status for a site, item, and warehouse. You can change the default status on the mobile device or on the purchase order, sales order, or transfer order line.

Below is the diagram of forms where you can set up a default inventory status.

Default inventory status configuration

More details can be found here:

https://docs.microsoft.com/en-us/dynamicsax-2012/appuser-itpro/set-up-an-inventory-status#optional-set-up-a-default-inventory-status

This was a summary on how to set up default inventory status.

Friday, December 4, 2020

Inventory journals in Microsoft Dynamics 365 F&SCM

The inventory journals in Supply Chain Management are used to post physical inventory transactions of various types, such as the posting of issues and receipts, inventory movements, the creation of bills of materials (BOMs), and the reconciliation of physical inventory. All of these inventory journals are used in a similar way, but are divided into different types.

Below you may find the illustration when to use specific journal types

More details can be found here:

https://docs.microsoft.com/en-us/dynamics365/supply-chain/inventory/inventory-journals

https://docs.microsoft.com/en-us/learn/modules/configure-inventory-management-dyn365-supply-chain-mgmt/10-inventory-journals

Thursday, December 3, 2020

Process customer returns in Microsoft Dynamics 365 F&SCM

Customers can return items to a company for various reasons, such as when an item is defective or if an item does not fulfill the customer's expectations.

The return process in Microsoft Dynamics 365 F&SCM is presented below


Additional details can be found here:

https://docs.microsoft.com/en-us/learn/modules/configure-manage-order-cash-dyn365-supply-chain-mgmt/7-customer-returns

https://docs.microsoft.com/en-us/dynamics365/supply-chain/warehousing/sales-returns

Configure and use commissions in Microsoft Dynamics 365 F&SCM

Supply Chain Management calculates sales commissions at the sales line level when a sales order is invoiced. When the sales order is being invoiced, the system searches for the related sales representative, item, and customer combination that are set up on the Commission calculation page.


Calculation walkthrough:

Customer orders 1 speaker at 480 price. 

Commission calculation is set to 2% of the revenue.

Commission share between 2 sales representatives is 50% each.

Commission transaction would be 9.6$ (480*0.02) and each of employee will get 4.8$

The additional details can be found here:

https://docs.microsoft.com/en-us/dynamics365/supply-chain/sales-marketing/tasks/set-up-sales-commission-rules

https://docs.microsoft.com/en-us/learn/modules/configure-manage-order-cash-dyn365-supply-chain-mgmt/8-commissions

Tuesday, December 1, 2020

Relationships in Sales and marketing in Microsoft Dynamics 365 F&SCM

 
You can use Sales and marketing to obtain, store, and use various types of customers in the sales and marketing flow. This data includes the original marketing initiative, future follow-up action, and additional stages of clients becoming a real customer.

Below you may find the illustration of the Relationships from Sales and marketing


Business scenario:

When any responsible person finds a potential customer or account who hasn't yet done any business with the company, such customer will be recorded as the Prospect in Microsoft Dynamics 365 F&SCM.

When Prospect is recorded, company lacks of information from him (which products he's interested in, what is the time frame he's planning the purchase or what his budget for purchase is). Upon communication, sales people qualify them, communicate with them to figure out what specifically they are interested in, when they plan the purchase and what their budget is. As the result, prospect get's converted to Opportunity.

Another branch of finding the potential customers is marketing. Marketing team might execute different campaigns to attract new clients and generate new leads. If client responds to marketing campaign, such customer will be recorded as the Lead. Lead it is a not yet qualified opportunity. 

Once lead is handed over from marketing to sales, sales people qualify them, communicate with them to figure out all the details. This process is called lead qualification and as a result of this process lead, if he meets qualification criteria (which may be different from company to company), get's converted to opportunity. 

Opportunity is then taken by sales people and usually goes through a series of steps that are a part of sales process. Sales job is to convert opportunities (qualified leads) to Customers.

Friday, November 27, 2020

Royalty contract management in Microsoft Dynamics 365 F&SCM

Royalty contract management is intended for companies that exercise the right to use a third party's assets and/or intellectual property.

Business scenario:  

A company (the "licensee") has an agreement to pay royalties to a third party (the "licensor") for use of their intellectual property, for instance, designs for the manufactured products. Payment terms are monthly based on the recorded sales invoices. 

Walkthrough:

First off all, you will need to create a contract with intellectual property owner

Create new Royalty agreement (Accounts payable > Broker and royalties > Royalty agreements)

In the Cumulate sales by field select Invoice to calculate the royalty amount every time that a sales order line is invoiced

In the Approval required option set to No, since we don\t want a royalty program owner approve the claims before a royalty can be turned into an invoice that is payable to the licensor.

Set the Accrual account and Expense account fields that will receive accrued amounts during the intermediate stage between approval and processing.

Under Selection tab in the lower part of the page select the products that qualify for a royalty fee.

Under Royalty amounts tab in the lower part of the page set up royalty rates

Click Validation button to validate the agreement. After validation agreement would be closed for editing. 

Note: If you need to change the agreement, click Validation button and check Remove validation flag. It will work if you don't have unprocessed claims. 

The next steps is to sell products that qualify for a royalty fee and generate a claim

Create new Sales order

Add line that was added to the Royalty agreement

Click Sales order line > View > Price details > Royalty FastTab to see royalty fee

Note: If you cannot see Price details option, navigate to Accounts receivable parameters page, on the Prices tab, on the Price details FastTab, set the Enable price details option to Yes.

Once sales order is invoiced, royalty claim will be generated.

To view all the claims, select Accounts payable > Broker and royalties > Royalty claims.

If Approval required option was set to No, royalty claim will be automatically processed, a vendor invoice for the royalty amount will be created and posted. As a result, the vendor's payable account is credited, and the Purchase expenditure for expense account for the category defined in the parameters is debited.

If Approval required option was set to Yes, royalty claim will NOT be automatically processed. A/P clerk must complete the royalty claim. On the Royalty claims page, on the Action Pane, A/P clerk needs to select Approve and then Process buttons. The following events occur upon process:
- the claim's status is changed to Completed:
- a Royalty accrual journal posting reverses the previous interim amounts on the accrual payable and expense amounts.
- a vendor invoice for the royalty amount is created and posted.

More details can be found here: https://docs.microsoft.com/en-us/dynamics365/finance/accounts-payable/royalty-contract