In this blog post I will go through different options for manual packing in Microsoft Dynamics 365 Supply Chain Management. It will cover majority of the capabilities available for manual packing.
We will be going through 4 scenarios:
- Move products to packing station for manual packing and move containers to the final shipping location immediately once packing is completed.
- Move products to packing station for manual packing and create a work to move containers to the staging location once the packing is completed.
- Move products to packing station for manual packing and create a work to move containers to the baydoor location once the packing is completed.
- Sort packed containers before shipping.
Useful links:
Manual packing functionality in Warehouse management in Microsoft Dynamics AX 2012 R3 - Microsoft Dynamics 365 Blog
Improved packing functionality (Dynamics 365 for Operations 1611) - Microsoft Dynamics 365 Blog
Outbound sorting - Supply Chain Management | Dynamics 365 | Microsoft Learn
Introduction to Containerization - Automated packing process in Microsoft Dynamics AX 2012 R3 - Microsoft Dynamics 365 Blog
Combined use of Manual packing and Containerization functionalities in an outbound process - Microsoft Dynamics 365 Blog
Scenario #1: In the first scenario we will configure the simple flow:
Goods are picked from the Bulk location and put into Pack station for manual packing. Then worker manually pack items into containers. Once items are packed, items are moved to Baydoor location right aways.
Let's start with the minimal configuration required to process the scenario described:
First what we need is to create Packing location type, Packing location profile, and Pack location
Packing location type:
Packing location profile:
Pack location (This location will be used to move items from Bulk location for packing):
Then we need to create container types where we will be packing our products to.
Container types:
It is necessary to define Maximum net weight.
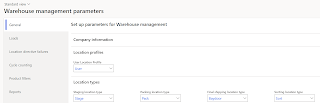
We then need to define default Packing location type in the Warehouse management parameters.
Warehouse management parameters:
We need to create Wave template to control our shipping process.
Wave templates:
We need to create Work template to move products from Bulk location to Pack location upon Sales order process.
Work template:
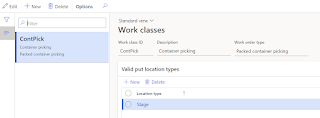
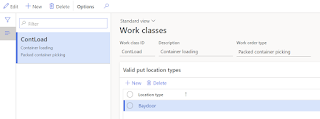
For Work template we need work classes and directive code.
Work class:
Directive code:
Now we need to determine from where we are picking products and where we are moving to.
Create Location directive to pick products from BULK.
Create Location directive to put products to Pack location.
Now let's configure Container packing policy that will control what should happen when we complete packing. In our scenario we will be moving our containers to the Baydoor location right away. Without any work creation.
For this scenario it is important to set Container release policy = Make available at final shipping location and define Default location for final shipping.
Container packing policy:
We need to create Packing profile that we will be selecting upon packing. You can create different packing profiles and then select specific when you do pack.
Packing profile:
We are done with configuration, let's see the process.
Walkthrough:
Create sales order and reserve inventory
Select Warehouse tab and then choose Release to warehouse.
Work is created to pick items from BULK location and put them into Pack location.
Let's complete work to speed up the process by using Complete button.
Now it's time for packing.
Go to Warehouse management > Packing and containerization > Pack
Make sure to select Pack location where we move our products to and select Packing profile created earlier.
Select Shipment ID of the sales order released.
Select New container and select Container type where you would like to pack your items in.
Select Item identifier.
Select Close container.
After container close, your containers will be moved to the Baydoor location and Shipment will be updated to Loaded. It means that sales order can be shipped.
Scenario #2:
What if we do not need to move containers immediately to final shipping locations. What if we need to create a work to move containers and then any available worker will pick it up and move it to the desired location. In this scenario, we are going to create a work to move containers to Staging location.
Make sure you create Stage location type, Stage location profile, Stage location and set Staging location type on the Warehouse management parameters for this scenario.
We will continue with what we have configured for scenario 1 and advance it with what we want to achieve in this scenario. We will create another Container packing policy and Packing profile.
Work templates, Location directives to move products from BULK to PACK - are without change. But we need to create another work template and location directives to create work to move containers from PACK to Stage location and then to BAYDOOR.
Let's create a work template Packed container picking that will be used to move items from Pack location to Staging location and then to Baydoor.
Work template:
For this work template we need 2 work classes:
Create 2 location directives to move containers to Stage and to move to Baydoor.
We need to create Container Packing policy that will create work to move containers. It is important to select Container release policy = Create work to move containers and then select Work template.
And then we need to link Packing Profile with Container packing policy.
Now we are ready to go with the process.
Walkthrough: Create Sales orders, release it and complete work to move items to Pack station similarly as it was done for scenario 1.
Go to Pack station.
Select Packing profile created previously to create work to move items to stage location.
Create new container and pack all items.
Close container.
Once you close, you will notice the message that Work has been created. As you can see the work has been created to move containers from Pack location to Stage and then from Stage to Baydoor.
Scenario #3
In the scenario above we moved containers to Stage location, but you can also create a work to move items to Baydoor location without staging. You just need to change the configuration a little bit.
Create a new work template to move to Baydoor.
Location directive still will be without change since we already have location directive to move to baydoor.
We need to create another Container packing policy and select the work template that will move containers to Baydoor instead of Stage.
Packing profile will look like:
Now you are able to use this packing profile in the Pack station, and once the container is closed - work will be created to move containers from Pack station to Baydoor.
Scenario #4
In addition to the flow above, you can also send the containers to the Sorting location to sort packed containers.
We would need Sorting location type, sorting location profile and Sorting location and set Sorting location type in the Warehouse management parameters.
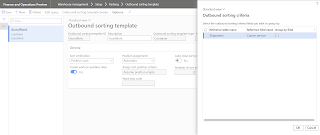
We need to create Outbound sorting template:
Edit query:
Outbound sorting template breaks:
Create new Container packing policy. It is important to set Container release policy = Assign container to outbound sorting position and select Default location for sorting.
Create new Packing profile and assign Container packing policy created.
Our Location directives, work templates and wave templates for sales orders will be without change.
We are going to pick up goods from location where they are available and put them into Pack location, where we will proceed with manual packing.
Since in this scenario, after container close, we will be moving containers to Sort location we need to determine where we need to move containers after sorting. We will move them to the baydoor. And for this we need to create new location directive and work template.
Location directive to move items from SORT location to Baydoor.
Work template:

We will also need to create Mobile device menu items to perform sorting.
We are done with configuration, let's proceed with the process.
Walkthrough:
Create Sales order, reserve inventory and complete work that will move items to Pack station (Nothing new, the same as before)
Pack items in the Pack station with the created Sort packing profile (the same way as before)
Close the container. Now your containers are moved to the Sort location.
On the mobile device, select Pallet build.
In the LP/Con field, enter the first container ID that is associated with sales order 1.
Select OK.
Because no sort positions currently exist, you must specify one. In the Sort position ID field, enter SP02.
Because no LP is currently associated with sort position SP02, you must specify one. In the LP field, enter LP02.
Select OK.
Because sort position validation is turned on, you must enter the sort position ID again. In the Sort Position ID field, enter SP02.
Select OK.
You receive a "Work completed" message.
Now you need to close a position.
On the mobile device select Pallet build.
In the LP/Con field, enter a container ID that was sorted to sort position SP02.
Select OK.
You receive the following message: "The container is already sorted to position SP02. Close the position?"
Select Close.
Work is completed.
Now the work has been created to move the goods to Baydoor
You must complete the sorted inventory picking work. When it's completed, the inventory will be picked to the sales order.
On the mobile device select Load from Sorting.
Enter the LP ID from the sort position, LP02.
Select OK.
The Sorted inventory picking: Pick page shows the pick work that must be done. Pick from the SORT location and target LP LP02.
Select OK.
The Sorted inventory picking: Put page shows the put work that must be done. Put to the Baydoor location and target LP LP02.
Select OK.
Work is completed.
You are done with Sorting and moving sorted containers for the shipping.
That's it!


