Monday, December 13, 2021

Two-legged intercompany chain VS Three-legged intercompany chain (Direct Delivery) in Microsoft Dynamics 365 Supply Chain Management

In this blog post I would like to provide an overview of intercompany flows and what is the expected process to be performed in Microsoft Dynamics 365 Supply Chain Management.

The following diagram illustrates the idea behind the two-legged intercompany chain and steps that typically performed in Microsoft Dynamics 365 Supply Chain Management to achieve the needed result.

The following diagram illustrates the idea behind the three-legged intercompany chain and steps that typically performed in Microsoft Dynamics 365 Supply Chain Management to achieve the needed result.


That's it!

Friday, December 10, 2021

How to enable Maintenance mode through Command prompt

In order, to enable the Maintenance mode - run Command prompt as administrator then execute the following command:

c:\AosService\PackagesLocalDirectory\Bin\Microsoft.Dynamics.AX.Deployment.Setup.exe --metadatadir c:\AosService\PackagesLocalDirectory --bindir c:\AosService\PackagesLocalDirectory\Bin --sqlserver . --sqldatabase axdb --sqluser axdbadmin --sqlpwd AOSWebSite@123 --setupmode maintenancemode --isinmaintenancemode true  + Enter

Next – execute the command:   IISreset + Enter

Maintenance mode enabled!

c:\AosService\PackagesLocalDirectory\Bin\Microsoft.Dynamics.AX.Deployment.Setup.exe --metadatadir c:\AosService\PackagesLocalDirectory --bindir c:\AosService\PackagesLocalDirectory\Bin --sqlserver . --sqldatabase axdb --sqluser axdbadmin --sqlpwd AOSWebSite@123 --setupmode maintenancemode --isinmaintenancemode false  +  Enter

 Next – execute the command:   IISreset  +  Enter

Maintenance mode disabled!

Tuesday, November 2, 2021

Tiered charges on purchase orders in Microsoft Dynamics 365 Supply Chain Management (D365)

There is a possibility to configure tiered charges for the purchase orders. For more details, visit this page - https://docs.microsoft.com/en-us/dynamicsax-2012/appuser-itpro/about-tiered-charges-on-sales-orders

In order to activate this feature, navigate to the Feature management workspace, find Charges from and to amounts on Purchase orders feature on the list and click Enable now button. Once you activate it, you can configure tiered charges.

Once you enable this feature, Automatic charges page will be extended with a few fields:


Mode of delivery code will determine when to apply charges: 

  1. Table: charges apply to a specific Mode of delivery defined in the Mode of delivery relation field.
  2. Group: charges apply to modes of delivery assigned to a specific delivery charge group defined in the Mode of delivery relation field. Prerequisites: 
    • Create charges groups (Accounts receivable > Charges setup > Delivery charges group) 
    • Assign modes of delivery to a charges group (Procurement and sourcing > Setup > Distribution > Modes of delivery > [select mode of delivery] > Charges group field)
  3. All:  charges apply to all modes of delivery.
From amount and To amount in the Auto charges page allow determine tiers. Based on the tiers the charge will/will not be applied to the purchase order header.

Go to Procurement and sourcing > Setup > Changes > Automatic charges and create tiered charges as presented below:


Go to Procurement and sourcing > Purchase orders > All purchase orders and create a purchase order for the vendor defined in the auto-charges setup.

Set the Qty and Price. Validate the order total. 

Calculate tiered charges via Purchase tab on the Action pane > Calculate (button group) > Tiered charges (button). 

Make sure that message is displayed: 

Tiered charges calculated.

Review calculated tiered charges via Purchase tab on the Action pane > Charges (button group) > Maintain charges (button). 

  • If Purchase order total amount < 50 USD, Charges of 10 USD will be applied automatically.
  • If Purchase order total amount >= 50 USD and Purchase order total amount < 100 , Charges of 7.5 USD will be applied automatically.
  • If Purchase order total amount >= 100 USD, Charges of 5 USD will be applied automatically.

Monday, November 1, 2021

Cannot download task recorder file on the local VM Microsoft Dynamics 365 Supply Chain Management (D365) . The error message "Sorry, something went wrong and the file wasn't downloaded" is thrown.

On the local VM, you might face an issue while trying to download the task recorder: Sorry, something went wrong and the file wasn't downloaded


In the error details you might see the issue with the Azure Storage. Azure Storage Emulator could be outdated and require manual update.

Follow the steps below to overcome the issue:

  1. Download and install latest version of Azure Storage Emulator: https://go.microsoft.com/fwlink/?linkid=717179&clcid=0x409
  2. Open Command prompt as administrator.  Change the directory (folder) in Command Prompt to Azure Storage Emulator installation directory (C:\Program Files (x86)\Microsoft SDKs\Azure\Storage Emulator)
  3. Run the following commands:
    • AzureStorageEmulator.exe stop
    • AzureStorageEmulator.exe clear
    • AzureStorageEmulator.exe init –server localhost 
    • AzureStorageEmulator.exe start
This should solve your issue and you will be able to download the task recorder. 

Tuesday, September 7, 2021

Recommendations in case of task recorder failures for "Automatic release of sales orders" in Microsoft Dynamics 365 Supply Chain Management (D365)

There is a known issue that task recorder changes steps on second playback on adding filters in query for "Automatic release of sales orders".

This issue is happening only for the forms that that are created using RunBaseBatch (for example, Create direct delivery orders, Automatic release of sales orders). 

For the forms that are using SysOperation, the issue is not present. (Automatic release of transfer orders, Change reservation hierarchy for item).

This is because for Dialog form enumeration begins from "filter" fields, and for SysOperationTemplateForm it starts from the beginning.

Recommendations to overcome this challenge:

  • For 1 user scenario. Re-record the broken scenario so that your task recording has the latest control names.  So you would probably need to go through the steps twice. First run - just go through the steps and apply all needed filters for the dialog and then when you run it for the second time start the recording itself. In this scenario, filters will be applied already and the system will not add any new controls. 
  • For multiple users scenarios. Dynamically added controls are stored per user, so the option that only the user who created recording will be able to run the task recording or the RSAT test case will not work in this case. Recommendation is that the usage data (including stored query) of recording and playback should be the same in order to not have these failures.

Vendor collaboration: Maintain vendor bank account in Microsoft Dynamics 365 Supply Chain Management (D365)

As a company/customer working with vendors, providing the ability for vendors to maintain their own information allows for efficiencies and reduces data entry errors. Once account changes are submitted, this information needs to be validated and primary account payment methods may also need to be modified. More information can be found here: https://docs.microsoft.com/en-us/dynamics365/finance/accounts-payable/maintain-vendor-bank-info

Vendors can use the Vendor collaboration functionality to maintain their bank account information. This topic explains how to add and maintain bank information for vendors that you do business with.

Turn on the vendor bank account information feature

Before you can use this feature, it must be turned on in your system. Administrators can use the Feature management page to check the feature status and enable it if needed. In the Feature management workspace, the feature is listed in the following way:

  • Module - Accounts payable
  • Feature name - Maintain vendor bank information using vendor collaboration workspace


After feature activation, you can now create vendor bank account. 
There are two places from where you can manage vendor bank accounts. It depends who will be managing the bank accounts. 
  • If Vendor is managing his own bank accounts by himself, she/he will use the following page: Vendor collaboration module > Vendor information link in the Workspaces section > More details > Bank information
  • If you company/customer (the D365 company issuing the PO or RFQ is a customer, then it states “Customer”) is managing bank accounts on behalf of the vendor, you will be using Accounts payable > Vendors > All vendors > Vendor tab > Set up section > Bank accounts
Adding a new bank account by vendor
This page is used by vendor to manage their bank accounts

Go to Vendor collaboration module > Vendor information link in the Workspaces section > More details > Bank information


To add a new bank account, select the Add button that is located above the Bank accounts grid in the Vendor information workspace. 


In the New dialog box that appears, you can enter the following information:
  • Bank account
  • Bank name
  • Bank account number
  • Bank routing number
  • Effective date
  • Expiration date
  • Comments (optional)
If the legal entity is outside the United States, the dialog box also includes fields for the SWIFT code and the International Bank Account Number (IBAN).
If there are any documents that are related to the specific bank account, you can attach them by selecting Document.


Bank information that vendors enter on the page will show Vendor as the source. You can also enter bank account information on a vendor's behalf. That information will appear here, and Customer will be shown as the source. For more information, see Create a vendor bank account: https://docs.microsoft.com/en-us/dynamics365/supply-chain/procurement/tasks/create-vendor-bank-account
After an account has been added, vendors can edit their bank's effective and expiration dates as required.

Vendor bank information inquiry

After bank account information has been added by a vendor, the information will be visible on the Vendor bank information inquiry page. 

Go to Accounts payable > Inquiries and reports > Vendor reports > Vendor Bank Account Inquiry


By default, all new or modified bank account records are visible on this page. 
An Accounts payable clerk can view the changes and validate the information through their confirmation process to validate. When the information has been confirmed, the bank account record listed on the page can be selected and marked as reviewed. Marking the record as reviewed will remove it from the default list.
All bank account changes are visible on the Vendor bank information inquiry page. If a change isn't displayed on the page, you can view it by adjusting the filters for the vendor account, effective date range, or choosing whether to include information for bank account changes that have been reviewed.
Once bank account is reviewed and marked as reviewed, Reviewed field will be updated accordingly. To update the Reviewed field back, Mark as reviewed button needs to be selected again. 

Adding a new bank account on behalf of vendor

This page is used by the company to manage vendor's bank accounts. The page is not accessible by the Collaboration Vendors. 

Go to Accounts payable > Vendors > All vendors > Vendor tab > Set up section > Bank accounts


There are several differences between this page and vendor collaboration bank information page:
  • If the bank account is entered from the vendor card, Source field will be set to Customer 
  • If the bank account is entered from the vendor card, Reviewed will be set to YES automatically and no need to review it again.

Vendor collaboration: Maintain vendor certification in Microsoft Dynamics 365 Supply Chain Management (D365)

This topic describes the steps that your vendors can use to maintain their certifications using the Vendor collaboration workspace. More information can be found here: https://docs.microsoft.com/en-us/dynamics365/finance/public-sector/manage-vendor-certification

Examples of certifications might include a Woman Business Enterprise (WBE) or a Leadership in Energy and Environment Design (LEED) company. Vendors will need to enter certification information in the Vendor information workspace. From there, vendors will select More details, and then select Certifications.

In 2012, vendors from the Vendor Portal could Add/Edit certifications related to their company.   There was no Workflow or validation around this functionality.  The functionality before this feature allowed vendors to view the certificates associated with their record. With new feature released the system has parity to the 2012 functionality, allowing Collaboration vendors to manage their certifications history.    

Turn on the vendor certification feature
Before you can use this feature, it must be turned on in your system. Administrators can use the Feature management page to check the feature status and enable it if needed. In the Feature management workspace, the feature is listed in the following way:
• Module - Accounts payable
• Feature name - Enable vendor collaboration certification management


Once feature is activated, the first step is to create a certification type. See below.

Add a certification type
  1. Go to Procurement and sourcing > Setup > Vendors > Certification type
  2. Select New button and fill in required fields

After certification type creation, you can now create certificates. 
There are two places from where you can manage certificates. It depends who will be managing the certificates. 
  • If Vendor is managing his own certificates by himself, she/he will use the following page: Vendor collaboration module > Vendor information link in the Workspaces section > More details > Certifications 
  • If you company/customer (the D365 company issuing the PO or RFQ is a customer, then it states “Customer”) is managing certificates on behalf of the vendor, you will be using Accounts payable > Vendors > All vendors > Vendor tab > Set up section > Certifications
Adding a new certification by vendor
This page is used by vendor to manage their certificates

Go to Vendor collaboration module > Vendor information link in the Workspaces section > More details > Certifications 


To add a new certification, select the Add button that is located above the Certification grid in the Vendor information workspace. 


Enter the following information:
  • Certification number
  • Certification type
  • Certifying organization
  • Certification date
  • Liability amount, if applicable
  • Effective date
  • Expiration date
  • Comments, optional
If there are documents related to the specific certification, you can attach them by selecting the Document button. By default, Restriction field is set to External.


Once the document is attached, the document field will be updated to reflect it.

Certifications that are entered by your vendors on this page will be assigned a Source of Vendor.
After certification information has been added by a vendor, certification needs to be reviewed.

Vendor certification inquiry

After certification information has been added by a vendor, the information will be visible on the Vendor certification inquiry page. 

Go to Accounts payable > Inquiries and reports > Vendor reports > Vendor certification inquiry

By default, all new or modified certification records are visible on this page. 
An Accounts payable clerk can view the changes and validate the information through their confirmation process to validate. When the information has been confirmed, the certification record listed on the page can be selected and marked as reviewed. Marking the record as reviewed will remove it from the default list.
All certification changes are visible on the Vendor collaboration generated certifications page. If a change isn't displayed on the page, you can view it by adjusting the filters for the vendor account, effective date range, or choosing whether to include information for certification changes that have been reviewed.
Once certification is reviewed and marked as reviewed, Reviewed field will be updated accordingly. To update the Reviewed field back, Mark as reviewed button needs to be selected again. 

Adding a new certification on behalf of vendor

This page is used by the company to manage vendor's certificates. The page is not accessible by the Collaboration Vendors. 

Go to Accounts payable > Vendors > All vendors > Vendor tab > Set up section > Certifications

There are several differences between this page and vendor collaboration certifications page:
  • If the certificate is entered from the vendor card, Source field will be set to Customer 
  • If the certificate is entered from the vendor card, Reviewed will be set to YES automatically and no need to review it again.

Saturday, August 14, 2021

After sales packing slip posting , Qty is set as Remaining Qty and not as Delivered Qty. Sales order still shows the Delivery remainder quantity.

There are multiple settings that are considered when posting sales packing slip and that might cause some uncertainty.

While posting sales packing slip, you see some issues, then you might want to check the following:

  • Check Item model group and verify that it is stocked item, physical inventory posting is activated. 
  • Check Sales order type and verify that it is normal sales order, not subscription/journal.

But also in this blog post I am going to talk about additional configuration that is in place and also should be verified.

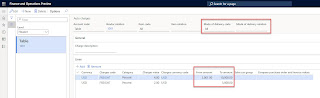
In the Account receivable > Account receivable parameters > Updates tab > Packing slip section there is a parameter that is called Automatic reduction, packing slip.


Below you may find the use case and some examples of the parameter usage.

Business scenario: 

The customer has ordered Qty that is more than the existing on-hand and you, as a company, in this case would like to ship whatever you have on-hand and adjust Deliver remainder to the remaining Qty that you have not shipped yet.

Typically if you try to post the packing slip for the ordered qty and you don't have he full Qty on-hand, then the system throws an error saying you cannot pick the items as the inventory is not available to that extent. When using Automatic reduction, packing slip option, the packing slip will be posted to an extent of the available inventory and the remaining order qty will be shown as Deliver Remainder.  If you have shortage of inventory, after posting packing slip, the Ordered qty will be still presented as Remaining qty.

For example,

If customer ordered 10 pieces and you have an on-hand of 6, if the packing slip is posted without this parameter activated, the system stop posting as you don't have the enough inventory. If this parameter is activated, the system will post the packing slip to that of available physical on-hand 6 and set remaining 4 as deliver remainder.

Let's review 3 scenarios below and their results when Automatic reduction, packing is activated:

Sales order line

On-hand

Result

On order Qty = 5 ea
Deliver remainder Qty = 5 ea
Delivered Qty = 0 ea

          Packing slip is posted with the following values in it: Ordered=5, Delivered = 0, Remaining quantity = 5.

          Message is displayed: Posting Sales order: <Sales order number> Item: <Item number> Quantity has been reduced to 0.00.

          Delivered Qty will be 0.

          Deliver remainder Qty will be 5.

On order Qty = 5 ea
Deliver remainder Qty = 5 ea
Delivered Qty = 0 ea

2

          Packing slip is posted with the following values in it: Ordered=5, Delivered = 2, Remaining quantity = 3.

          Message is displayed: Posting Sales order: <Sales order number> Item: <Item number> Quantity has been reduced to 2.00.

          Delivered Qty will be 2.

          Deliver remainder Qty will be 3.

On order Qty = 5 ea
Deliver remainder Qty = 5 ea
Delivered Qty = 0 ea

5

          Packing slip is posted with the following values in it: Ordered=5, Delivered = 5, Remaining quantity = 0.

          Message is not displayed.

          Delivered Qty will be 5.

          Deliver remainder Qty will be 0.


Friday, August 6, 2021

Estimated amount field logic on the sales order in Microsoft Dynamics 365 Supply Chain Management (D365)

In this blog post I would like to provide the logic for the Estimated amount field that is stored on the sales order header.

First off all, the system determines whether the estimate value should be calculated for the sales order

Refer to SalesTable, SetEstimate method 

If the customer account (or invoice account if they are different) has a credit limit and the customer has specified mandatory credit limit then it would be estimated. 

If customer doesn't have a credit limit and the customer has not specified mandatory credit limit then we determine whether the estimate should be calculated based off of the setting for the customer.

If Credit limit type in the Accounts receivable parameters is set to one of these values (Balance, Balance + All, Balance + packing slip or product receipt) then it would be estimated. 

Refer to this.custTable_CustAccount().shouldEstimateBeCalculated() in the SalesTable, SetEstimate method.

How the system calculates Estimated amount:

- If the Credit limit type in the Accounts receivable parameters is set to Balance + All, then the system takes Sales totals (Sales order > Totals where Selection = Packing slip)

- If the Credit limit type in the Accounts receivable parameters is set to Balance + packing slip, then the system takes  Sales totals (Sales order > Totals where Selection = All)

Refer to SalesTable, method updateEstimateBasedOnCreditMaxCheck

Tuesday, May 25, 2021

Feature "Include Confirmed ship and Confirmed receipt dates into date filters on Load planning workbench" in Microsoft Dynamics 365 Supply Chain Management

There is a nice feature available that will simplify the daily work for the Transport planner on the Load planning workbench. "Include Confirmed ship and Confirmed receipt dates into date filters on Load planning workbench" feature enables filtering by confirmed dates first, and only when they are empty, the requested dates. 

Transport planner don't need to manually follow-up and make a filter on the sales order line overview to find out what are the confirmed ship/receive dates to create the loads.

With this feature the worker will get the correct information of the shipping/receiving dates that will have high impact for the users to perform their day to day jobs. 

Walkthrough:

Navigate to Feature management and enable feature “Include Confirmed ship and Confirmed receipt dates into date filters on Load planning workbench”.

The description says: 

This feature expands the existing filtering capability of the Ship date and Receipt date fields on the Load Planning Workbench to include the sales order line's Confirmed ship and Confirmed receipt dates to determine lines to add to a load. If those dates are blank, order lines will be filtered based on the Requested ship and Requested receipt dates respectively.

Create sales order with 2 sales order lines (1 line with Confirmed dates and the second line is without:


Navigate to Warehouse Management module / Loads / Load planning workbench.

Select Sales lines tab.

Filter the Ship date based on the Confirmed ship date from the Sales Order. The line with the populated Confirmed ship date will be displayed.

Filter the Ship date based on the Requested ship date from the Sales Order. The line with the blank Confirmed ship date, but populated Requested ship date will be displayed.


Monday, April 19, 2021

Item allocation failed in Microsoft Dynamics 365 Supply Chain Management

When you see an error below, you will need to check the main source of such issues - Location directives.

Item %Item number% allocation failed.

Shipment %Shipment numebr% has been removed from wave %Wave number%.

No Work was created for Wave %Wave number%.

Solution: 

  • If you are using batch enabled product, then ensure location directive has batch enabled and strategy suggested.
  • Check location directive and ensure location directive actions are present and valid
  • Ensure location directive and directive code is linked well in work template
  • Ensure multiple SKU on pick location directive is not checked (it's meant for put type)

The following places can help you identify the root cause:

  • Work creation history log
  • Processing history in wave

Error: Cloudbuild.Npm.CredentialFetchFailedException: Failed to fetch credentials for feed

I have spent tremendous amount of time figuring out what is going on while installing NPM packages upon new VM deployment for the Supply Chain management. 

An error that I was getting the following:

An error occurred installing your NPM packages. You can set %NPMWRAPPER_LOGLEVEL% to Finest and %NPMWRAPPER_VSTSNPMAUTHEXELOGGINGLEVEL% to Detailed for more detailed logs. Error:
Cloudbuild.Npm.CredentialFetchFailedException: Failed to fetch credentials for feed: 
at Cloudbuild.Npm.Program.<>c__DisplayClass7_0.<<InstallYarnPackagesAsync>b__0>d.MoveNext()
--- End of stack trace from previous location where exception was thrown ---
at System.Runtime.ExceptionServices.ExceptionDispatchInfo.Throw()
at System.Runtime.CompilerServices.TaskAwaiter.HandleNonSuccessAndDebuggerNotification(Task task)
at Cloudbuild.Npm.Program.<InstallYarnPackagesAsync>d__7.MoveNext()
--- End of stack trace from previous location where exception was thrown ---
at System.Runtime.ExceptionServices.ExceptionDispatchInfo.Throw()
at System.Runtime.CompilerServices.TaskAwaiter.HandleNonSuccessAndDebuggerNotification(Task task)
at Cloudbuild.Npm.Program.Main(String[] args)

Solution: Open Visual Studio 2017 and Sign in. Then re-run init command. 
I am blown away by the simplicity of the solution.

I hope this safe your time!

Wednesday, March 10, 2021

How to connect to Microsoft Dynamics 365 F&SCM environment in Chrome when certificate is invalid

It might happen that certificate for the Microsoft Dynamics 365 F&SCM environment has been expired and while connecting to the environment through Google Chrome you might see the following error:


In this scenario, you have to rotate secrets from LCS. If it's urgent to process with the access to the environment, there is a lifehack. On the screen (with the error), just type in on your keyboard the following phrase and you will be able to connect to the environment even without having to complete secrets rotation:

 thisisunsafe

Saturday, February 6, 2021

Power Virtual Agent. Build a simple chatbot to find out the holidays

Below you may find the design of the topic conversation path within Power Virtual Agent to request an information about national holidays.