Thursday, April 11, 2024

Transfer order with Landed cost module in Microsoft Dynamics 365 SCM (D365)

In this blog post I would like to cover one of the most common requirements for transfer orders: how to add transportation cost to the product while you are doing transfers in Supply Chain Management. 

There are few ways how you can do transfers in the system. But almost none of them allow you to add charges. 

Let's review them. 

Transfer journals: this journal even does not have Charges functionality in it. It is simple transfer between some locations. 

Transfer orders: this option does not allow you to add any charges as well. 

Transfer orders with TMS: this option allows you to add changes but only with the posting to the ledger. If you need to add the transportation cost to the item - this option will not work for you. 

Transfer orders with Landed cost: this option allows you to define the transportation cost and add it to the item. We are going to stick with this option and review how it is done in the system

Below is a recap of what is mentioned above


Let's start with the minimum configuration that is required for Landed cost module to achieve the requirement above. 

We will need to have statuses for our voyages. Voyages will be our representation of the movement between 2 locations. So we should have at lest 2 statuses, that will indicate that voyage is shipped and received. 

Voyage statuses


Landed cost parameters

General tab:


Status updates tab:


Feature visibility tab:
This is important parameter that will enable voyages to be created manually. 

Vessels

In our scenario we will be delivering our products by truck. So I am going create just 1 vessel and name it Truck.


Shipping container types

Since we are delivering via Truck and I am not going to create any specific containers types. Let's assume that we are going to have 1 fixed-size box type and name it Default. 


Shipping containers

The same as above, we will have only 1 container and name it Default. 


Cost type codes

Let's assume that for our transportation cost we would like to have 2 charges. 1 charge will be for delivering the goods and 1 charge for loading the product into the truck. In our scenario, we are also would like to increase the cost of our item by this transportation charges. In other words, we would like the handling cost to be absorbed in the inventory value of the item.

Create 2 cost type codes for the scenario above. 

Freight


Labor


That's it about Landed cost module configuration. There are other settings that might affect the process, but in order to make it simple and still achieve the requirement, we will make the minimum config. 

Now it is time to get down to the scenario itself. 

Walk-through

First off, we are going to buy our product and check the cost of the product. 


In this scenario we purchase 35 000 tons of the item with the total amount of 1907666.25 dollars. So our cost of the item is 1907666.25/35000 = 54.50475

Next steps is to create a transfer order to move from one site/warehouse to another one. Go to Inventory management > Outbound orders > Transfer orders


Once the transfer order is created, we need to create a voyage. 

Go to Landed cost > Voyages > All voyages and select New button to create a voyage.

Note: Vessel can be entered manually and it can represent vessel plate number


In the Voyage editor page, select the transfer order that was created and select Add to staging list button. 


Select View staging list button.


Select Add to new shipping container button to pack it to a container. Since we don't have any containers, we will select Default that we have created. 

After that transfer order will be added to the voyage.


Select the voyage ID hyperlink to check the voyage created.


Next is to add transportation costs to the voyage. Select Voyage costs button.

We are going to add to cost type codes for Freight and Labor. 


To review the transportation cost inquiry, go to voyage and select Manage tab > Cost inquiries.


Now, just Ship transfer orders by selecting corresponding menu. 


To reduce the number the steps, we are going to auto receive it. Select auto receive flag to do it. 


If you check the Transfer order itself, transfer order is now in the Received status. 


Let's see the results of the voyage posting. 

From Voyage line select Inventory -> Transactions.

We see that Cost amount is accounted for transportation costs as well. 


Let's calculate this amount. We moved 6900 tons. The cost of the item is 54.50475. 

Step1: 6900*54.50475=376,082.775

Step2: 376,082.775 +131997.00 (Freight cost) = 508,079.775

Step3: 508,079.775 + 13800 (Labor cost) = 521,879.775 = 521,879.78

Select Transactions in financial voucher, you can see that Adjustment has been posted to accumulate the transportation cost. 


Select Voucher transactions.


Here you don't see any transportation costs, amount considering only cost of the item is posted. So where does transportation cost go? 

Select Voyage costs > Estimate adjustments


Select Voucher

Here you can see that it was posted to Debit materials, since we are adding charges to the item and it posts credit into Landed cost clearing account. It is a little bit surprising that it does not pick up accounts from the Credit setup of the Cost type code. It uses clearing account instead. 

Now let's review the cost of the item to see that transportation costs added to the item cost. 


Now we need to clear our clearing account and post charges to the credit accounts that were initially setup in the cost type codes. To do so, go to AP > Invoice journal. Create a new journal. 

We will debit our landed cost clearing account, and credit our expense account for the transportation. 


Do not use Functions -> Select voyage, or do not set any voyages at the bottom. It will create extra GL transactions which we don't need. It will make sense to do it for Purchase orders, but not for Transfer orders.


Lets see all the voucher transactions at once. Now we see that everything is balanced, Landed cost clearing account is balanced to 0. Handling costs increased the inventory and posted to the expenses. 


That's it for today!

Wednesday, February 14, 2024

Cannot open Charge codes page in Microsoft Dynamics 365 SCM

If you experience an issue by trying to open charge codes page and you get an error saying that "The menu item with markuptable could not be opened", you might want to check all the messages in the Action center.  You might see the following issues, like: 

  • Parameter record does not exist.
  • Cannot set 'Tax calculation behavior' setting to option other than 'Don't recalculate' when feature "Enable proper tax calculation for returns with partial quantity" is enabled.

This issue can be solved by disabling some feature. The feature that causes this issue is "Enable proper tax calculation for returns with partial quantity". Once you disable this feature, the issue will disappear. 

That's it!

Wednesday, February 7, 2024

Vendor contact information in Microsoft Dynamics 365 SCM

In this blogpost I would like to review where you can setup some master data for vendor contacts. 

When you try to setup vendor contact (Accounts payable > Vendors > All vendors > Contacts > Add contacts), some of the configuration are presented as lookups. Below are the details, where you can find them in the system. 

  • Personal title: Data is taken from Organization administration > Global address book > Name title and suffix. Records with Type = Title will be available in the lookup
  • Personal suffix: Data is taken from Organization administration > Global address book > Name title and suffix. Records with Type = Suffix will be available in the lookup
  • Job title: Data is taken from Sales and marketing > Setup > Contacts > Contact person titles. Some examples may include the following:

    Title

    Person title alias

    Account Manager

    Account Manager

    Admin

    Admin

    Assistant

    Assistant

    Consultant

    Consultant

    Cust Service

    Cust Service

    Developer

    Developer

    Finance

    Finance

    General

    General

    IT

    IT

    Management

    Management

    Marketing

    Marketing

    Pre-sales

    Pre-sales

    Purchase

    Purchase

    Sales

    Sales

    Technical

    Technical

    Training

    Training

    Warehouse

    Warehouse

  • Function: Data is taken from Sales and marketing > Setup > Contacts > Functions of persons
  • Salutation: Data is taken from Sales and marketing > Setup > Contacts > Salutation
  • Complementary: Data is taken from Sales and marketing > Setup > Contacts > Complimentary close
  • Decision: Data is taken from Sales and marketing > Setup > Contacts > Decision
  • Loyalty: Data is taken from Sales and marketing > Setup > Contacts > Loyalty
  • Character: Data is taken from Sales and marketing > Setup > Contacts > Character
  • Language:  Data is taken from Human resources > Setup > Language codes > Language codes

  That's it!


Tuesday, February 6, 2024

Safety stock journals: calculation logic in Microsoft Dynamics 365 SCM

Imagine you have a store and you need to make sure you never run out of popular items, like bread or milk. Safety stock is like having a backup supply just in case more people buy than expected, or if your supplier takes longer to deliver.

In Microsoft Dynamics 365 SCM, there's a tool called the Safety Stock Journal. It looks at how much products you've sold in the past to figure out how much extra you should keep in stock. This helps you avoid running out of things customers want to buy.

The Safety Stock Journal helps you plan how much extra stuff to keep based on what you've sold before. It's like using past sales to predict future needs, so you always have enough on hand.

In my scenario I have been selling cement product for past year and I had 16 lb set as a minimum inventory level. Now, I want to see if I need to adjust this level based my issue history statistics.

For this functionality, we will need to consider a few settings:

Purchase lead time (in my scenario I have set it up on the default order settings, but you can overwrite it on the item coverage). I have 4 days set as lead time.


Minimum inventory quantity. I have 16 pounds. 

Historical issue statistic. Let's see what I have in the inventory transactions:


In our scenario, we are interested in issues transactions which are Sold or Deducted

Now it is time to see what system can propose and whether we need to update our existing level of 16 pounds. 

Walkthrough: 

1. Go to Master planning > Master planning > Run > Safety stock calculation.
2. On  the Action Pane, select New
3. On the Journal header details FastTab, select the safety stock journal name.
4. On the Journal lines FastTab, select Create lines.
5. Select the date range:
From date – Select the start date of the period that issues should be included in the calculation for.
To date – Select the end date of the period that issues should be included in this calculation for. There must be at least two months between the start and end dates. 

In our scenario we have selected 12 months date range. It is important to notice the number of month you selected here, since it will be used in the calculations later. If you select less than 3 month period, the calculation of new minimum will not be meaningful.

6. Select the product you want to include into calculation

7. Select parameter “Calculate standard deviation” to calculate the standard deviation and get an indication how variable your historic demand has been.

Once you select OK on the dialog, the system will create a line and calculate some important statistic. 


Let's review how the system came up with these numbers. 

Average issues per month = Total of issues divided by defined period. In our case, sum of all issues for 12 months = 500 and then 500/12 month period = 41.67


Standard deviation of issues per month indicates how average number of issues of an item per month are spread out from the average. A low standard deviation means that most of the numbers are very close to the average. A high standard deviation means that the numbers are spread out around the average.

Standard deviation is calculated by the following formula (you can find some examples here: https://www.scribbr.com/statistics/standard-deviation/): 

Let's calculate our deviation: 


You can also check \Classes\ReqItemJournalCreate\calcStdDeviationPerMonth

This method is calculating the standard deviation per month and populating StdDeviationIssueMonth field on Safety stock journal.

Average issue per lead time indicates the number of stock that we need to carry out through the lead time.
Important note here. Depends on whether you set Working days parameter for your lead time or not, calculation will be different. 

If  Working days = NO, Average issue per lead time calculation is the following:

Number of days in a month (30 days - hardcoded) divided by lead time. In our scenario 30 days needs to be divided by 4 days lead time. Then Average issue per month divide by the calculated value.


If  Working days = YES, Average issue per lead time calculation is the following:

We cannot take the full month of 30 days, because there are some weekends. So, instead of 30 days, we should take 5/7ths (30 / 7 * 5) = 21.4286 days (hardcoded value).

Number of days in a month 21.4286) divided by lead time. In our scenario 21.4286 days needs to be divided by 4 days lead time. Then Average issue per month divide by the calculated value. 


In my scenario, to validate it, I went back on the item and updated Working days to YES and I had to create the line from scratch to consider this new parameter. 


Now we know how these 3 fields are calculated. 
Let's see what will the system  propose as a new minimum level. 

On the Journal lines FastTab, select Calculate proposal.

You have to choose the method from 2 which are available:
  • Use average issue during lead time. Calculated minimum quantity values based on the average issue during the specified period.
  • Use service level. Calculated minimum quantity values based on the desired service level
Use average issue during lead time. This is the most commonly used. 

Multiplication factor. You can set this factor if you see for example hurricane is coming and you expect more demand so that you will require to carry more stock. For example, enter 1.0 to use the exact calculated average or 1.1 to add an extra buffer of 10 percent.

Lead time margin – Enter a value to extend the normal lead time by (for example, to allow for administration).

When you select this method the calculation will be the following.

If Working days parameter set to NO.

If Multiplication factor is set then the result is multiplied by multiplication factor. In our case it was set to 10. 

Use service level.

When you select this method the calculation will be the following.

In order to understand the service levels you need to see the hard coded safety factors – these are in the code and are considered standard factors associated with % service levels.


So the formula will be the following:


If we select the service level of 98, the safety factor will be different:


As soon as you ready, you can set new minimum quantity field and select Post button. This will update minimum field in the item coverage. 

That's it for today.

Sunday, September 10, 2023

Confirmation for serial numbers is now supported in 10.0.37 Microsoft Dynamics 365 SCM

In this blogpost I am going to walk through the new feature released in 10.0.37 Microsoft Dynamics 365 Supply Chain Management.

Before this feature is introduced, it was possible to confirm only batch numbers for the products where batch number is above the locations in the reservation hierarchy. This functionality was not available for serial numbers.

Batch and license plate confirmation - Supply Chain Management | Dynamics 365 | Microsoft Learn

For many organizations, especially for the manufacturing processes, it is highly important that picker picks the right product. Without this feature picker might take a different serial number then the one specified in the work line and he didn't have a way to confirm the serial number that was reserved for the picking work.

In 10.0.37 a new configuration was introduced: 

  • Go to Warehouse management > Setup > Mobile device > Mobile device menu items 
  • Select Sales picking mobile device menu item
  • Select Work confirmation button
  • Serial confirmation parameter is displayed.


Limitations and considerations:

  • Serial confirmation is supported only for serial above items
  • It is not supported for piece by piece picking

Now let's walk through the example. 

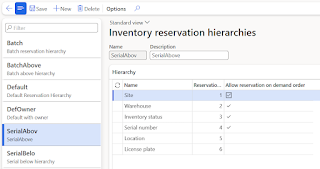
First of all, we need to created Serial above reservation hierarchy

  • Go to Warehouse management > Setup > Inventory > Reservation hierarchy
  • Create a new one and select serial number above the location.


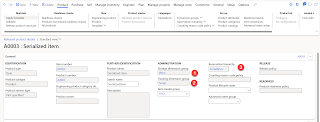
Then let's create a product with enabled serial number tracking dimension and serial above reservation hierarchy. 

We also will need on-hand for this product. I am going to add 3 ea for 3 different serial numbers S1, S2 and S3


It is time to create a sales order. 
Create sales order with product.
Reserve inventory and release to warehouse.

You will notice that work is created


As you can see, the system is reserving S1 serial number, so worker will be guided to pick up this specific serial number.


Let's now log in to the mobile device and do the picking.
I will start by navigation to Work list to see all open works.
Select the work with the serialized product created previously. 
System will ask to scan the License plate. 

Now the system asks to confirm serial number. This step is displayed because we activated new configuration - Serial confirmation on the mobile device menu item. 

If you scan a serial number that doesn't match to the serial number on the work line - you will get an error message. 

If it matches, the next step to scan target LP will be displayed. 
And the rest steps are typical for the picking process and not related to the new feature. 
Confirm the put step.

Once you confirm - work completed message will be displayed

That's it!