Monday, December 7, 2020

Configure vendor rebates in Microsoft Dynamics 365 F&SCM

A vendor rebate is a type of vendor allowance or incentive in which a part of the purchase price is returned by the seller(vendor) to the buyer(company) when a specified quantity or value of goods has been purchased within a specified period.


Business scenario:  

A company qualifies for a monetary reward in return for achieving preset purchase targets. Payment terms are monthly based on the recorded purchase invoices. 

Walkthrough:

First off all, you will need to create a contract 

Create new Vendor rebate agreement (Procurement and sourcing > Vendor rebates > Rebate agreements)

In the Cumulate purchase by field select Invoice to calculate the rebate amount every time that a purchase order line is invoiced

In the Approval required option set to No, since we don't want a owner approve the rebate claims before a rebate can be accrued or paid out.

Set the Accrual account and Expense account fields that will receive accrued amounts during the intermediate stage between approval and processing.

Under Line tab in the lower part of the page select the products that qualify for a rebate program.

In the Rebate line break type field select the Quantity. Enter 1 in the From value field and 3 in the To value field. In this case, the rebate amount applies when you purchase one or two items, but not when you purchase three items.

Click Validation button to validate the agreement. After validation agreement would be closed for editing. 

Note: If you need to change the agreement, click Validation button and check Remove validation flag. It will work if you don't have unprocessed claims. 

The next steps is to buy products that qualify for a rebate program and generate a claim.

Create new Purchase order

Add line that was added to the Vendor rebate agreement

Click Purchase order line > View > Price details > Rebate FastTab to see rebate amount

Note: If you cannot see Price details option, navigate to Procurement and sourcing parameters page, on the Prices tab, on the Price details FastTab, set the Enable price details option to Yes.

Once purchase order is invoiced, royalty claim will be generated.

To view all the claims, select Procurement and sourcing > Vendor Rebates > Rebate claims.

If Approval required option was set to No, rebate claim will be automatically processed (status is Completed), a vendor invoice for the rebate amount will be created and posted. As a result, the vendor's payable account is debited, and the Purchase expenditure for expense account for the category defined in the parameters is credited.

If Approval required option was set to Yes, rebate claim will NOT be automatically processed. A/P clerk must complete the rebate claim. On the Rebate claims page, on the Action Pane, A/P clerk needs to select Approve and then Process buttons. The following events occur upon process:

- the claim's status is changed to Completed:

- A Rebate accrual journal posting has reversed the previous interim amounts on the accrual and expense accounts.

- A vendor invoice (credit note) for the rebate amount has been created. the vendor's Payable account is debited, and the Discounts and Allowances received account is credited

How to setup a default inventory status in Microsoft Dynamics 365 F&SCM

How to setup a default inventory status in Microsoft Dynamics 365 F&SCM

Inventory status can be categorized as available or unavailable. You can use the inventory blocking parameter to block items with an unavailable inventory status. Items with a blocked status are considered physical inventory and cannot be used in a production order, sales order, transfer order, or outbound transaction.

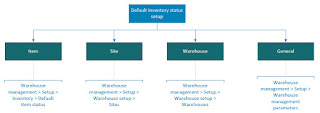
After you have set up an inventory status you can set the default inventory status for a site, item, and warehouse. You can change the default status on the mobile device or on the purchase order, sales order, or transfer order line.

Below is the diagram of forms where you can set up a default inventory status.

Default inventory status configuration

More details can be found here:

https://docs.microsoft.com/en-us/dynamicsax-2012/appuser-itpro/set-up-an-inventory-status#optional-set-up-a-default-inventory-status

This was a summary on how to set up default inventory status.

Friday, December 4, 2020

Inventory journals in Microsoft Dynamics 365 F&SCM

The inventory journals in Supply Chain Management are used to post physical inventory transactions of various types, such as the posting of issues and receipts, inventory movements, the creation of bills of materials (BOMs), and the reconciliation of physical inventory. All of these inventory journals are used in a similar way, but are divided into different types.

Below you may find the illustration when to use specific journal types

More details can be found here:

https://docs.microsoft.com/en-us/dynamics365/supply-chain/inventory/inventory-journals

https://docs.microsoft.com/en-us/learn/modules/configure-inventory-management-dyn365-supply-chain-mgmt/10-inventory-journals

Thursday, December 3, 2020

Process customer returns in Microsoft Dynamics 365 F&SCM

Customers can return items to a company for various reasons, such as when an item is defective or if an item does not fulfill the customer's expectations.

The return process in Microsoft Dynamics 365 F&SCM is presented below


Additional details can be found here:

https://docs.microsoft.com/en-us/learn/modules/configure-manage-order-cash-dyn365-supply-chain-mgmt/7-customer-returns

https://docs.microsoft.com/en-us/dynamics365/supply-chain/warehousing/sales-returns

Configure and use commissions in Microsoft Dynamics 365 F&SCM

Supply Chain Management calculates sales commissions at the sales line level when a sales order is invoiced. When the sales order is being invoiced, the system searches for the related sales representative, item, and customer combination that are set up on the Commission calculation page.


Calculation walkthrough:

Customer orders 1 speaker at 480 price. 

Commission calculation is set to 2% of the revenue.

Commission share between 2 sales representatives is 50% each.

Commission transaction would be 9.6$ (480*0.02) and each of employee will get 4.8$

The additional details can be found here:

https://docs.microsoft.com/en-us/dynamics365/supply-chain/sales-marketing/tasks/set-up-sales-commission-rules

https://docs.microsoft.com/en-us/learn/modules/configure-manage-order-cash-dyn365-supply-chain-mgmt/8-commissions

Tuesday, December 1, 2020

Relationships in Sales and marketing in Microsoft Dynamics 365 F&SCM

 
You can use Sales and marketing to obtain, store, and use various types of customers in the sales and marketing flow. This data includes the original marketing initiative, future follow-up action, and additional stages of clients becoming a real customer.

Below you may find the illustration of the Relationships from Sales and marketing


Business scenario:

When any responsible person finds a potential customer or account who hasn't yet done any business with the company, such customer will be recorded as the Prospect in Microsoft Dynamics 365 F&SCM.

When Prospect is recorded, company lacks of information from him (which products he's interested in, what is the time frame he's planning the purchase or what his budget for purchase is). Upon communication, sales people qualify them, communicate with them to figure out what specifically they are interested in, when they plan the purchase and what their budget is. As the result, prospect get's converted to Opportunity.

Another branch of finding the potential customers is marketing. Marketing team might execute different campaigns to attract new clients and generate new leads. If client responds to marketing campaign, such customer will be recorded as the Lead. Lead it is a not yet qualified opportunity. 

Once lead is handed over from marketing to sales, sales people qualify them, communicate with them to figure out all the details. This process is called lead qualification and as a result of this process lead, if he meets qualification criteria (which may be different from company to company), get's converted to opportunity. 

Opportunity is then taken by sales people and usually goes through a series of steps that are a part of sales process. Sales job is to convert opportunities (qualified leads) to Customers.

Friday, November 27, 2020

Royalty contract management in Microsoft Dynamics 365 F&SCM

Royalty contract management is intended for companies that exercise the right to use a third party's assets and/or intellectual property.

Business scenario:  

A company (the "licensee") has an agreement to pay royalties to a third party (the "licensor") for use of their intellectual property, for instance, designs for the manufactured products. Payment terms are monthly based on the recorded sales invoices. 

Walkthrough:

First off all, you will need to create a contract with intellectual property owner

Create new Royalty agreement (Accounts payable > Broker and royalties > Royalty agreements)

In the Cumulate sales by field select Invoice to calculate the royalty amount every time that a sales order line is invoiced

In the Approval required option set to No, since we don\t want a royalty program owner approve the claims before a royalty can be turned into an invoice that is payable to the licensor.

Set the Accrual account and Expense account fields that will receive accrued amounts during the intermediate stage between approval and processing.

Under Selection tab in the lower part of the page select the products that qualify for a royalty fee.

Under Royalty amounts tab in the lower part of the page set up royalty rates

Click Validation button to validate the agreement. After validation agreement would be closed for editing. 

Note: If you need to change the agreement, click Validation button and check Remove validation flag. It will work if you don't have unprocessed claims. 

The next steps is to sell products that qualify for a royalty fee and generate a claim

Create new Sales order

Add line that was added to the Royalty agreement

Click Sales order line > View > Price details > Royalty FastTab to see royalty fee

Note: If you cannot see Price details option, navigate to Accounts receivable parameters page, on the Prices tab, on the Price details FastTab, set the Enable price details option to Yes.

Once sales order is invoiced, royalty claim will be generated.

To view all the claims, select Accounts payable > Broker and royalties > Royalty claims.

If Approval required option was set to No, royalty claim will be automatically processed, a vendor invoice for the royalty amount will be created and posted. As a result, the vendor's payable account is credited, and the Purchase expenditure for expense account for the category defined in the parameters is debited.

If Approval required option was set to Yes, royalty claim will NOT be automatically processed. A/P clerk must complete the royalty claim. On the Royalty claims page, on the Action Pane, A/P clerk needs to select Approve and then Process buttons. The following events occur upon process:
- the claim's status is changed to Completed:
- a Royalty accrual journal posting reverses the previous interim amounts on the accrual payable and expense amounts.
- a vendor invoice for the royalty amount is created and posted.

More details can be found here: https://docs.microsoft.com/en-us/dynamics365/finance/accounts-payable/royalty-contract


How to scrap the defective units in Quarantine order in Microsoft Dynamics 365 F&SCM.

Let's imagine the following scenario: 

The company has 6 units of the Surface Pro 128 GB that is under inspection in quarantine zone. Quality inspector finds out that 2 of them are defective and need to be scrapped. What are the steps to perform this operation in Microsoft Dynamics 365 F&SCM?

Create Quarantine order for 6 pieces of the Surface Pro 128 GB (Inventory management > Periodic tasks > Quality management > Quarantine orders).

Quarantine order status is Created.

Notice that inventory transactions with the reference Quarantine order will be created:

Issue status is On order from the main warehouse

Receipt status is Ordered to the Quarantine warehouse

Start the order inspection by clicking Start button. Quarantine order status is Started.

Notice that inventory transactions with the reference Quarantine order will be updated:

Issue status is Deducted from the main warehouse

Receipt status is Received to the Quarantine warehouse

Issue status is Reserved physical from the quarantine warehouse

Receipt status is Ordered to the main warehouse

From Quarantine order, select Split function

Enter a split quantity of 2

Notice that new quarantine order of 2 units is created. Status and transactions are inherited from the parent order.

Select the Scrap function

Enter a scrap quantity. 

Notice that inventory transactions with the reference Quarantine order will be updated:

Issue status is Sold from the main warehouse

Receipt status is Purchased to the Quarantine warehouse

Issue status is Sold from the quarantine warehouse

Receipt transaction to the main warehouse is removed.

Quarantine order status is Ended.

End the order inspection by clicking End button for the 4 units. Quarantine order status is Ended.

Notice that inventory transactions with the reference Quarantine order will be updated:

Issue status is Sold from the main warehouse

Receipt status is Purchased to the Quarantine warehouse

Issue status is Sold from the quarantine warehouse

Receipt status is Purchased to the main warehouse

Commitment types in the Sales/Purchase agreements in Microsoft Dynamics 365 F&SCM

Default commitment type must be selected upon sales/purchase agreements creation. Each option is defined below, but generally speaking, an agreement needs to differentiate between value (price) and quantity.

The commitment type indicates whether you agree to purchase a specific quantity of products or products for a specific amount from the vendor. If you change the default commitment type, and then create a new line, the line is defined by the commitment type that you selected. 

Product quantity commitment: You agree to purchase a specific quantity of products; The lines that use this commitment type are defined by an item number, and the quantity and unit that were agreed on; The Amount field is not editable. 

Product value commitment: You agree to purchase products for a specific amount; The lines that use this commitment type are defined by an item number and the amount that was agreed on; The Quantity and Unit fields are not available. 

Product category value commitment: You agree to purchase for a specific amount and from a specific procurement category; The lines that use this commitment type are defined by a procurement category in the hierarchy of procurement categories and an amount; The Quantity and Unit fields are not available. 

Value commitment: You agree to purchase for a specific amount, and from a top-level procurement category or the category's subordinate categories; The lines that use this commitment type are defined by the top-level procurement category in the hierarchy of procurement categories and an amount; The Quantity and Unit fields are not available.

Tuesday, September 15, 2020

Data cache clean up in Microsoft Dynamics 365 F&SCM

In addition to the ways described here: https://gfeaxblog.wordpress.com/2017/12/14/ax-2012-clear-the-cache/

you have a couple of additional options to refresh the cache

#1 Run the class from browser

https://Environment name/?cmp=Company name&mi=SysClassRunner&cls=SysFlushAOD

Note: Please replace the text highlighted with your environment data

#2 Run Data cache clean up from the System parameters

System administration > Setup > Data cache > Data cache parameters > Cache refresh tab

Thursday, September 3, 2020

PowerBI embedded in Tier1 and Tier2 environments

What is the proper way to access the data tables for Power BI in Production, Sandbox, etc?  

If you need to connect PowerBI to Microsoft Dynamics 365 for Finance and Operations you have several options depends on the environment that you are using.

Tier2 (PROD/UAT/TEST) or Tier1 (developer onebox)

  • Tier2 environments have Azure SQL AXDW database which can be configured for automatic updates using System Administration > Entity Store > Refresh all cubes/measures. In that form you can setup update recurrence(some cubes you can update once a day, some once an hour). To access data in Tier2 you can use Direct Query. Direct Query connection to the cubes (AXDW database) is done through  Azure SQL database

Note: ODATA has access only to AXDB and does not have access to cubes, only to AXDB data.

  • Tier1 environments have only SQL databases and that is real headache to configure PowerBI embedded for onebox environment. It requires external AXDW configured in Azure. 

Tuesday, August 11, 2020

How to create KPI measure in Power BI

If you want to build KPI visuals as it is presented on the screen below, you can achieve this by adding new measure and use the following DAX expression

KPI =
SWITCH (
TRUE (),
[Profit/Loss] > 0, unichar(9650),
[Profit/Loss] < 0, unichar(9660)
)

If Profit/Loss value is negative, you will have black down-pointing small triangle. If Profit/Loss is positive, you will have black up-pointing small triangle.

If you want to have different colors based on the values, you may use Conditional formatting as it is presented below.

Monday, August 10, 2020

How to apply Regional settings from the Source data formats to the exported data through Data management

As you might know, there is a possibility to setup Regional settings on the Source data format in the Data management. 


Unfortunately those settings are not applied automatically. The important thing to make it work is the following:

When create Export project and add entity to the project, set Skip staging toggle to NO. Only in this case, Regional settings will work.


How to use grouping in Power BI and apply group to the DAX expression

 Let's say you have field that contains the fixed list of values and you want to group them. In my scenario I have TypeID field that contains the following values: Revenue, Liability, Equity, ProfitandLoss, Expense, BalanceSheet, Asset, Total. In my case, Revenue, Liability, Equity corresponds to Credit and the rest to Debit. What can I do? 

  1. Highlight the TypeID, right-click and choose New group
  2. Set the Group name (TYPEIDGROUP for example)
  3. Select Revenue, Liability, Equity values in the Ungrouped values section and click Group button. Rename group in the Group and members section and set Credit name
  4. Select remaining values in the Ungrouped values section and click Group button. Rename group in the Group and members section and set Debit name. 
  5. The result should be as presented on the screen


Now, you are able to connect to the group and use it in the formula. For example, I used it in the created measure:

Actuals credits positive =
CALCULATE ( FinancialReportingTransactionDataV2_FinancialReportingFactWithSDF[Actuals],
FinancialReportingTransactionData_FinancialReportingAccount[TYPEIDGROUP] = "Debit" )
- CALCULATE ( FinancialReportingTransactionDataV2_FinancialReportingFactWithSDF[Actuals],
FinancialReportingTransactionData_FinancialReportingAccount[TYPEIDGROUP] = "Credit")

Another option is to use IN expression

Labor =
CALCULATE
(
    FinancialReportingTransactionDataV2_FinancialReportingFactWithSDF[Actual operating]*-1,
FinancialReportingTransactionData_MainAccount[VALUE] in {"600300", "600400"}
)

It's up to you to decide which approach to use.  

Wednesday, August 5, 2020

How to find and get quarter / quarter name (month / month name) from a given date in Power BI

Let's imagine that we have General ledger attributes table that contains Date field

You would like to extract Years, Quarters, Months values from the Date field. For this purpose you can create new columns (Month, Quarter and Year) and use the following DAX expressions:

Month = MONTH('General ledger attributes'[Date])
Quarter = QUARTER('General ledger attributes'[Date])
Year = Year('General ledger attributes'[Date])

The issue you might experience is that Month column will return numeric values instead of text (like 1,2,3,4,....12). Quarter column will return numeric values also (like 1,2,3,4).

What if you want to have text values. For Quarters, for instance, to have Q1, Q2, Q3 and Q4. For Months, to have January, February etc.

You may try to use the following expression:
FORMAT('General ledger attributes'[Date], "MMM")

If it doesn't work as it was in my case, because of the following error message
Function 'FORMAT' is not allowed as part of calculated column DAX expressions on DirectQuery models.
you can create additional columns and use the following expressions:

MonthName =
SWITCH('General ledger attributes'[Month], 1,"January", 2,"February",3,"March",4,"April",
5,"May",6,"June",7,"Jul",8,"August",9,"September",10,"October",11,"November",12,"December")

QuarterName = SWITCH('General ledger attributes'[Quarter], 1,"Q1", 02,"Q2",3,"Q3",4,"Q4")

The structure of the columns will be the following:

Now you can build visualizations using new created columns.

Monday, July 27, 2020

Batch Management Service cannot be started

If you experience the following issue while starting Microsoft Dynamics 365 Unified Operations: Batch Management Service:

Windows could not start the Microsoft Dynamics 365 for Operations - Batch Management Service service on Local Computer.
Error 1064:An Exception occurred in the service when handling the control request.

The reason might be because your environment is set to Maintenance mode.

To change this, execute the following script:

update SQLSYSTEMVARIABLES SET VALUE = 0 where PARM = 'CONFIGURATIONMODE'

Afterwards, do not forget to restart IIS by running the following command:

C:\windows\system32> iisreset

Friday, July 24, 2020

How to turn on maintenance mode through SQL in Microsoft Dynamics 365 F&SCM

In order to turn on maintenance mode in Microsoft Dynamics 365 F&SCM through SQL, the following steps needs to be performed:
  1. Open Microsoft SQL Server Management Studio 
  2. Connect to the Server
  3. Expand AxDB database and execute the following script

update SQLSYSTEMVARIABLES SET VALUE = 1 where PARM = 'CONFIGURATIONMODE'

       See the result of the update:

select * from SQLSYSTEMVARIABLES

    After update, execute iisreset command in cmd. 

    To return back execute the following query:

update SQLSYSTEMVARIABLES SET VALUE = 0 where PARM = 'CONFIGURATIONMODE'

Tuesday, March 31, 2020

High-level changes within Small parcel shipping (SPS) feature in Microsoft Dynamics 365 F&SCM

Within this article I would like to provide with the high-level changes that were made within Small parcel shipping functionality.

1.  Container weight configuration
     Transportation management à Setup à Carriers à Shipping carriers
     Average container weight field

2.  Carrier account assignment
     Transportation management à Setup à Rating à Carrier service account

3. Customer carrier account assignment
    Accounts receivable à Customers à All customers à General tab à Carrier customer accounts

4. Carrier label printing configuration
    Warehouse management à Setup à Containers à Container packing policy à Carrier label printing section
     Upon Container Close, label will be printed that is stored on the Route Segment Container if:

  •  Print Container Shipping Label Rule is not Never
  •  Manifest Requirements For Container is set to Transportation Management 
  •  Container manifest id is specified on the container

5. Print shipping label
    Warehouse management à Packing and containerization à Containers à Shipping label
     Label will be printed that is stored on the Route Segment Container.
     The system will try to find Route Segment Container by Container ID and Container manifest ID (ShipCarrierTrackingNum). Once found, there is a field on the Route Segment Container contained label that will be printed. That field is called ContainerShippingLabel (is not visible from UI)

6. Carrier customer account assignment per sales order
    Accounts receivable à Orders à All Sales orders à Transportation tab à Carrier customer account field

Friday, March 27, 2020

Responsibility center is blank while creating Budget Plan in Microsoft Dynamics 365 F&SCM


You may experience an issue with the Responsibility center lookup while creating Budget plan.

If you have Security model = Based on security organizations in the Budget Planning Configuration (Budgeting > Setup > Budget planning > Budget planning configuration), follow the steps below to fix this issue:

1. Go to the Worker who is creating Budget plan (Human resources > Workers > Workers).
2. Click Work Position Assignment in the Action pane.
3. Drill down to Positions  clicking on the Hyperlink.
4. Check the Department value. Note department value.
5. Go to Organization administration > Organization > Operating units.
6. Select the Department of the worker noted in the step 4.
7. Make sure that “In hierarchy” toggle is turned on.
8. Fill in Manager field, if empty.
9. Go to Organization administration > Organization > Organization hierarchy.
10. Select the hierarchy that is used for the budget planning process for which budget plan is being created.
11. Make sure that Security purpose is assigned.
12. Make sure that department noted in the step 4 is included into the hierarchy.
13. Go to System administration > Users. Find user who is creating budget plan. Make sure that Personnel field is filled in by worker value used in step 1.
14. Make sure that user (from step 13) has Budgeting role assigned.
15. Click Assign organizations button. Make sure that access is granted to hierarchy noted in step 10.

Try to create budget plan. I hope it solved the issue.

Thursday, March 26, 2020

Turn on new Small parcel shipping (SPS) feature in Microsoft Dynamics 365 F&SCM

Within 10.0.9 Application release, Platform Update 33 (PU33) Small parcel shipping (SPS) feature has been added. In order to activate this feature you would need to complete the following steps:
  1. Insert Flight name (aka Feature name) into SYSFLIGHTING
  2. Restart IIS
  3. Check for updates in the Feature management 
  4. Enable Small parcel shipping (SPS) in the Feature management 
Step 1:  Insert Flight name into SYSFLIGHTING

Open SQL Server Management Studio as Administrator and execute the following SQL statement to insert the TMSSmallParcelShippingFeature flight into the SYSFLIGHTING table.

insert into dbo.SYSFLIGHTING(FLIGHTNAME, ENABLED, FLIGHTSERVICEID) values ('TMSSmallParcelShippingFeature', 1, 12719367)

Step 2: Restart IIS

Open command-line(cmd) as System administrator and at the command prompt, type:

iisreset

Step 3:  Check for updates in the Feature management

Navigate to System administration > Workspaces > Feature management 
Click Check for updates button

Step 4:  Enable Small parcel shipping (SPS) in the Feature management 

Find Small Parcel Shipping feature within Transportation management module and click Enable button.

Friday, March 6, 2020

Due date alerts batch job is not working in Microsoft Dynamics 365 F&SCM (Platform update 31)

With the Platform update 31, Platform update 32, you may experience the issue with Due date alerts batch job (System administration > Periodic tasks > Alerts > Due date alerts).

In general, Due date alerts batch job is in Executing status but does nothing, it just gets stacked.

The result of this is that Microsoft Dynamics 365 Unified Operations: Batch Management Service service is terminating unexpectedly and restarting every 2 mins.

Having investigated Due date alert batch job, the root cause was found. The system fails here:


As a workaround in order to fix it, you could set 2 weeks for the Alert rule instead of “is due in 1 calendar day”.

I do know that it’s quite an odd solution if you are using Due date alerts constantly.

The good news is that Microsoft released a hotfix already for this issue.

Platform 31 - KB 4537849 Stack overflow caused by recursion 
https://fix.lcs.dynamics.com/Issue/Details/1277393?kb=4537849&bugId=408330&dbType=3&qc=1efe704342b29b568e9306fead37964410dd0958d71da87fbcb070612a53c21b

Platform 32 - KB 4537705 Stack overflow caused by recursion
https://fix.lcs.dynamics.com/Issue/Details/1277393?kb=4537705&bugId=407923&dbType=3&qc=1efe704342b29b568e9306fead37964410dd0958d71da87fbcb070612a53c21b

You can use the link below to install these hotfixes: https://docs.microsoft.com/en-us/dynamics365/fin-ops-core/dev-itpro/migration-upgrade/download-hotfix-lcs


Thursday, February 27, 2020

Grouping in grids feature in Microsoft Dynamics 365 F&SCM

Within Platform Update 33 (PU33) Grouping in grids feature has been added. In order to activate this feature, navigate to the Feature management workspace, find Grouping in grids feature on the list of System administration module and click Enable now button. Once you activate it, you can use grouping in grids capabilities.

This feature, which requires the new grid control to also be enabled, allows users to group data within grids. This empowers users to analyze data and calculate subtotals per group. Grouping can be saved as part of the saved view definition when the saved views feature is enabled.

For more details, visit this page - https://docs.microsoft.com/en-us/business-applications-release-notes/April19/dynamics365-finance-operations/grid-experience

With this new feature you can do the following:
1. In any grid decide by which field you would like to group your data.
2. Right click on that field and select Group by this column.
3. Grid will be presented in the grouped way by the column that you've set. In the example below, the grouping by Customer account on the Open customer invoice grid has been made.
Unfortunately, Totals are displayed for the whole grid and not per grouped field. In our case it doesn't make much sense, since there can be multiple currencies and the totals in this case are not correct.

New grid control in Microsoft Dynamics 365 F&SCM

Within Platform Update 33 (PU33) New grid control feature has been added. In order to activate this feature, navigate to the Feature management workspace, find New grid control feature on the list of System administration module and click Enable now button. Once you activate it, you can use new grid capabilities.

This feature replaces the existing grid control with a new control that has faster rendering, smoother scrolling, and less jumping when navigating in the grid. The new grid also allows drag-and-drop column reordering, entry of mathematical expressions in numeric cells, the ability to calculate totals at the bottom of numeric columns, and the ability to get ahead of the system when editing or creating data.

For more details, visit this page - https://docs.microsoft.com/ru-ru/dynamics365-release-plan/2019wave2/finance-operations-crossapp-capabilities/user-productivity-new-grid

With this new feature you can do the following:
1 - move/reorder columns by dragging them
2 - add columns through context menu
3 - add/hide footer to display totals for any integer/decimal columns
4 - hide columns through context menu
5-  use mathematical formulas in the numeric fields
6,7,8,9 - review totals in the footer section


Create Saved views and share with the users in Microsoft Dynamics 365 F&SCM

Within Platform Update 33 (PU33) new Saved views feature has been added. In order to activate this feature, navigate to the Feature management workspace, find Saved views feature on the list of System administration module and click Enable now button. Once you activate it, you can configure personalized view of the form.
This feature allows users to have multiple named sets of personalizations per page. Views can also be published to security roles.
For more details, visit this page - https://docs.microsoft.com/en-us/business-applications-release-notes/April19/dynamics365-finance-operations/saved-views
To create a new view of the form, navigate to any form that you would like to personalize.
Under the name of the form, you will notice "My view" option. Click arrow down and select Save as. This will trigger new view creation.
Provide a new name for the view.
After that, using Personalize this page button on the Options tab, make any changes that you would like (Add fields, hide fields, move fields etc)
Once you are done with personalization, you will need to save it. You will notice that it's unsaved view through asterisk. Click Save option and modified view will be saved.

If you need to share created view, you can click three dots icon and select Publish option.

In the opened form, you will have to specify the security role with whom you would like to share the view.
In a nutshell, this feature allows you to  create optimized views of a form that might speed up the process, simplify the user experience, and improve user productivity.

How quickly navigate to the List Page from Details form in Microsoft Dynamics 365 F&SCM

Have you ever noticed the link that is available at the top of the Details form? Let's say, Released product form (Product information management > Products > Released products).
If you click on any item, you will be drilled down into details of the selected product. If you need quickly go back into List page, you can easily click on the link, instead of clicking Close button (or Esc button on your keyboard).


Friday, February 21, 2020

Utilize ability to configure Dynamics 365 Finance and Operations - Warehousing app for multiple environments

Did you know that you can connect Dynamics 365 Finance and Operations - Warehousing app to multiple instances?
You could use it if you build your own solution and you need to test the developed solution in several environments, like Test environment, UAT etc.
In the Dynamics 365 Finance and Operations - Warehousing app there is an option to do so.

Open Dynamics 365 Finance and Operations - Warehousing app
Open hamburger menu and chose Settings
In the Connection settings window, Click on the drop-down list in the Select connection field.

In the Select connection window, click on the hamburger menu.

In the Action window, select New connection option.


 In the Add connection window, fill in required information.


Once you save it, you will be able to select environment in the Connection settings window, to which you would like to connect.

Thursday, February 20, 2020

Product identifier not found while barcode scanning in the Dynamics 365 Finance and Operations - Warehousing

If you experience an issue with the barcode scanning in the Dynamics 365 Finance and Operations - Warehousing and see an error message the Product identifier not found as presented below
You must have forgotten to turn on the Scanning flag on the barcode itself for that item.

Go to Product information management > Products > Released products > Manage inventory tab on the Action pane > Bar codes button in the Warehouse section

Switch to the General tab for the selected bar code and switch on Scanning flag.


Wednesday, February 19, 2020

Tips for Planning optimization in Microsoft Dynamics 365 for Finance and Operations

With new Planning optimization in Microsoft Dynamics 365 for Finance and Operations that will be available in the first half of the 2020, you would probably need to think about the following:

  1. Planning optimization service will be a black box. You will not be able to extend and customize calculations in the Planning optimization micro-service
  2. You would be able to customize the Pre-processing logic of the master data
  3. You would be able to customize the Post-processing logic of the master data
  4. Currently there are no extra charges announced for the improvement. Planning optimization is included in the current license. So, if you have an access to the Master planning functions (MRP), you will be able to get an access to the Planning optimization feature.
  5. Future additional planning functionality might come with additional charge.
  6. Planning is triggered add-hoc during office hours, but Planning optimization service can be cancelled while Planning is progress and no data corruptions occur. 
  7. Environment add-in needs to be installed through Dynamics Lifecycle Services (LCS) prior to using Planning optimization service.
  8. Standard planning capabilities (MRP) will be deprecated
  9. The sooner you start Planning optimization utilization (including testing, investigating different scenarios), the sooner you will find out all possible gaps for the real-time Planning optimization utilization.


Monday, February 17, 2020

Credit management in Microsoft Dynamics 365 for Finance and Operations

Within Platform Update 33 (PU33) new Credit management feature has been added. In order to activate this feature, navigate to the Feature management workspace, find Credit management feature on the list and click Enable now button.
Once you enable it and reload the page, new forms would have been added to the Credit and collections module.

All newly added forms are highlighted as Favorite on the screen below.

Turn on Business events in Microsoft Dynamics 365 for Finance and Operations (Platform version : Update31)


You must have been determined that business events parameters form is missing in the System administration module in the 10.0.7 (Platform version : Update31).


So in this version, you can activate Business events through SQL using the script below:

UPDATE [dbo].[BUSINESSEVENTSPARAMETERS]SET [ENABLED] = 1
,[PROCESSORTHREADS] = 1
,[ENDPOINTRETRYCOUNT] = 3
,[BUNDLESIZE] = 50
,[ENDPOINTSPEREVENT] = 10
GO

Do not forget to restart IIS and batch service once the script is executed.

In the 10.0.9 (Platform version : Update33) business events parameters back


How to provision user on the deployed Microsoft Dynamics 365 for Finance and Operations

You might notice that Provisioning shortcut is missing on the desktop of the deployed Microsoft Dynamics 365 for Finance and Operations environment.

To provision your user, use the following path:

K:\AosService\PackagesLocalDirectory\bin

In this opened folder you can find .exe file that is called AdminUserProvisioning.
Run that file, enter required information and wait until it's completed.

Now, you can log in to the deployed environment under provisioned user.


Friday, February 7, 2020

How to enable navigation bar in Microsoft Dynamics 365 Finance and Operations

If you would to get rid of Search and would like to display Navigation bar instead, you will need to follow the steps below:
Before:
After:


Go to System administration > Setup > Client performance option 
Turn on Enable legacy navigation bar flag

Tuesday, February 4, 2020

Dynamics 365 for Finance and Operations AOT Browser


If you would like to open and browse the contents of the AOT (Application Object Tree) from the UI, you can use the following link:
https://github.com/arbelatech/aotbrowser#what-is-the-aot-browser

Once you install a deployable package, you will be able to see new form located here:
Common > Common > AOT browser.

Next step is to run "Populate AOT objects" and wait until it's completed. After a while, you will be able to perform the following:

  1. Search/Filter
  • By AOT name or by label name
  • By object type
  1. Open from form personalization screen
  2. Open from data entities form
  3. Open in table browser (tables/views)
  4. View extensions inline
  5. View source code
  6. Jump to references
  7. View label value instead of label id