Tuesday, May 25, 2021

Feature "Include Confirmed ship and Confirmed receipt dates into date filters on Load planning workbench" in Microsoft Dynamics 365 Supply Chain Management

There is a nice feature available that will simplify the daily work for the Transport planner on the Load planning workbench. "Include Confirmed ship and Confirmed receipt dates into date filters on Load planning workbench" feature enables filtering by confirmed dates first, and only when they are empty, the requested dates. 

Transport planner don't need to manually follow-up and make a filter on the sales order line overview to find out what are the confirmed ship/receive dates to create the loads.

With this feature the worker will get the correct information of the shipping/receiving dates that will have high impact for the users to perform their day to day jobs. 

Walkthrough:

Navigate to Feature management and enable feature “Include Confirmed ship and Confirmed receipt dates into date filters on Load planning workbench”.

The description says: 

This feature expands the existing filtering capability of the Ship date and Receipt date fields on the Load Planning Workbench to include the sales order line's Confirmed ship and Confirmed receipt dates to determine lines to add to a load. If those dates are blank, order lines will be filtered based on the Requested ship and Requested receipt dates respectively.

Create sales order with 2 sales order lines (1 line with Confirmed dates and the second line is without:


Navigate to Warehouse Management module / Loads / Load planning workbench.

Select Sales lines tab.

Filter the Ship date based on the Confirmed ship date from the Sales Order. The line with the populated Confirmed ship date will be displayed.

Filter the Ship date based on the Requested ship date from the Sales Order. The line with the blank Confirmed ship date, but populated Requested ship date will be displayed.


Monday, April 19, 2021

Item allocation failed in Microsoft Dynamics 365 Supply Chain Management

When you see an error below, you will need to check the main source of such issues - Location directives.

Item %Item number% allocation failed.

Shipment %Shipment numebr% has been removed from wave %Wave number%.

No Work was created for Wave %Wave number%.

Solution: 

  • If you are using batch enabled product, then ensure location directive has batch enabled and strategy suggested.
  • Check location directive and ensure location directive actions are present and valid
  • Ensure location directive and directive code is linked well in work template
  • Ensure multiple SKU on pick location directive is not checked (it's meant for put type)

The following places can help you identify the root cause:

  • Work creation history log
  • Processing history in wave

Error: Cloudbuild.Npm.CredentialFetchFailedException: Failed to fetch credentials for feed

I have spent tremendous amount of time figuring out what is going on while installing NPM packages upon new VM deployment for the Supply Chain management. 

An error that I was getting the following:

An error occurred installing your NPM packages. You can set %NPMWRAPPER_LOGLEVEL% to Finest and %NPMWRAPPER_VSTSNPMAUTHEXELOGGINGLEVEL% to Detailed for more detailed logs. Error:
Cloudbuild.Npm.CredentialFetchFailedException: Failed to fetch credentials for feed: 
at Cloudbuild.Npm.Program.<>c__DisplayClass7_0.<<InstallYarnPackagesAsync>b__0>d.MoveNext()
--- End of stack trace from previous location where exception was thrown ---
at System.Runtime.ExceptionServices.ExceptionDispatchInfo.Throw()
at System.Runtime.CompilerServices.TaskAwaiter.HandleNonSuccessAndDebuggerNotification(Task task)
at Cloudbuild.Npm.Program.<InstallYarnPackagesAsync>d__7.MoveNext()
--- End of stack trace from previous location where exception was thrown ---
at System.Runtime.ExceptionServices.ExceptionDispatchInfo.Throw()
at System.Runtime.CompilerServices.TaskAwaiter.HandleNonSuccessAndDebuggerNotification(Task task)
at Cloudbuild.Npm.Program.Main(String[] args)

Solution: Open Visual Studio 2017 and Sign in. Then re-run init command. 
I am blown away by the simplicity of the solution.

I hope this safe your time!

Wednesday, March 10, 2021

How to connect to Microsoft Dynamics 365 F&SCM environment in Chrome when certificate is invalid

It might happen that certificate for the Microsoft Dynamics 365 F&SCM environment has been expired and while connecting to the environment through Google Chrome you might see the following error:


In this scenario, you have to rotate secrets from LCS. If it's urgent to process with the access to the environment, there is a lifehack. On the screen (with the error), just type in on your keyboard the following phrase and you will be able to connect to the environment even without having to complete secrets rotation:

 thisisunsafe

Saturday, February 6, 2021

Power Virtual Agent. Build a simple chatbot to find out the holidays

Below you may find the design of the topic conversation path within Power Virtual Agent to request an information about national holidays.

Monday, December 7, 2020

Configure vendor rebates in Microsoft Dynamics 365 F&SCM

A vendor rebate is a type of vendor allowance or incentive in which a part of the purchase price is returned by the seller(vendor) to the buyer(company) when a specified quantity or value of goods has been purchased within a specified period.


Business scenario:  

A company qualifies for a monetary reward in return for achieving preset purchase targets. Payment terms are monthly based on the recorded purchase invoices. 

Walkthrough:

First off all, you will need to create a contract 

Create new Vendor rebate agreement (Procurement and sourcing > Vendor rebates > Rebate agreements)

In the Cumulate purchase by field select Invoice to calculate the rebate amount every time that a purchase order line is invoiced

In the Approval required option set to No, since we don't want a owner approve the rebate claims before a rebate can be accrued or paid out.

Set the Accrual account and Expense account fields that will receive accrued amounts during the intermediate stage between approval and processing.

Under Line tab in the lower part of the page select the products that qualify for a rebate program.

In the Rebate line break type field select the Quantity. Enter 1 in the From value field and 3 in the To value field. In this case, the rebate amount applies when you purchase one or two items, but not when you purchase three items.

Click Validation button to validate the agreement. After validation agreement would be closed for editing. 

Note: If you need to change the agreement, click Validation button and check Remove validation flag. It will work if you don't have unprocessed claims. 

The next steps is to buy products that qualify for a rebate program and generate a claim.

Create new Purchase order

Add line that was added to the Vendor rebate agreement

Click Purchase order line > View > Price details > Rebate FastTab to see rebate amount

Note: If you cannot see Price details option, navigate to Procurement and sourcing parameters page, on the Prices tab, on the Price details FastTab, set the Enable price details option to Yes.

Once purchase order is invoiced, royalty claim will be generated.

To view all the claims, select Procurement and sourcing > Vendor Rebates > Rebate claims.

If Approval required option was set to No, rebate claim will be automatically processed (status is Completed), a vendor invoice for the rebate amount will be created and posted. As a result, the vendor's payable account is debited, and the Purchase expenditure for expense account for the category defined in the parameters is credited.

If Approval required option was set to Yes, rebate claim will NOT be automatically processed. A/P clerk must complete the rebate claim. On the Rebate claims page, on the Action Pane, A/P clerk needs to select Approve and then Process buttons. The following events occur upon process:

- the claim's status is changed to Completed:

- A Rebate accrual journal posting has reversed the previous interim amounts on the accrual and expense accounts.

- A vendor invoice (credit note) for the rebate amount has been created. the vendor's Payable account is debited, and the Discounts and Allowances received account is credited

How to setup a default inventory status in Microsoft Dynamics 365 F&SCM

How to setup a default inventory status in Microsoft Dynamics 365 F&SCM

Inventory status can be categorized as available or unavailable. You can use the inventory blocking parameter to block items with an unavailable inventory status. Items with a blocked status are considered physical inventory and cannot be used in a production order, sales order, transfer order, or outbound transaction.

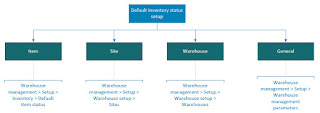
After you have set up an inventory status you can set the default inventory status for a site, item, and warehouse. You can change the default status on the mobile device or on the purchase order, sales order, or transfer order line.

Below is the diagram of forms where you can set up a default inventory status.

Default inventory status configuration

More details can be found here:

https://docs.microsoft.com/en-us/dynamicsax-2012/appuser-itpro/set-up-an-inventory-status#optional-set-up-a-default-inventory-status

This was a summary on how to set up default inventory status.