Tuesday, January 14, 2020

Table browser caller for Microsoft Dynamics 365 for Finance and Operations

When you work with MSDyn365FO as a functional consultant, you will definitely have the need to view the Microsoft Dynamics 365 for Finance and Operations tables.

The best way to do so (instead of using Visual studio, or typing /?mi=SysTableBrowser) is to use Chrome extension.
That extension is called Table Browser Caller for D365FO. To install it follow the steps below:

Open https://chrome.google.com/webstore/category/extensions in the Chrome browser.
Search for Table Browser Caller for D365FO.
Click Add to Chrome button.

Confirm the installation by clicking Add extension button
Wait until you receive the confirmation that extension has been added
The new icon will be added to the browser.
Click on the added icon in the browser.


Switch to the Config tab.
In the Dynamics 365 for Finance and Operations base URL, you will notice the default URL address.
Click on the Add icon.
Insert the URL to Dynamics 365 for Finance and Operations environment.
Click the Save icon.
Switch to the Table Browser Caller tab.
In the Company Id, type in the legal entity code.
In the Search for table name field, type in the MSDyn365FO table and press Enter.
A new tab in the browser will be opened and data from the selected table will be presented.

Monday, January 13, 2020

Review the standard Power BI reports available in Microsoft Dynamics 365 for Finance and Operations

Use this article to review standard Power BI reports that are used within Microsoft Dynamics 365 for Finance and Operations to pull out the relevant data from the system.
To review the default out-of-the-box settings and calculations used in Power BI follow the steps below:
Log in to LCS (https://lcs.dynamics.com/).
in the Power BI Desktop.
Click on Shared asset library.
Find Power BI report model.
Select any Power BI model file.
Click on the filename link.
Power BI report will be downloaded.
Open downloaded file on the Dev VM machine through Power BI Desktop app.
Select Edit Queries -> Data source settings.
 Click Change Source button
In the Server field, type in Server name value.
Click Close.
Click Apply changes button.
Click Refresh button.
In the SQL Server database window appeared, select Use my current credentials option.
Select the level to which you would like to apply the settings.
Click Connect.
In order to get data from Finance and Operations, go to System administration > Setup  >Entity Store
Click Refresh button for the entity you need.
For instance, for the Microsoft Dynamics 365 for Operations Financial performance Power BI model file, refresh finance related entities.
After that, go back to Power BI Desktop and click Refresh.
All data will be displayed. 

Sunday, January 12, 2020

Get the list of security roles involved in the process for Finance and Operations (MSDyn365FO)

The fastest way to receive the list of security roles that have access to the forms involved in the specific process, use BPM requirements document that you can generate from BPM library.

Follow these steps to achieve this:
  1. Go to LCS (https://lcs.dynamics.com/).
  2. Open LCS project.
  3. Select Business process modeler in the More tools section.
  4. Select Business process library.
  5. In the BPM library, select the parent process .
  6. In the right pane, on the Overview tab, click Doc button.
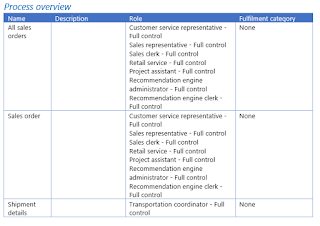
In the downloaded file, find the Process overview section.

This section will contain the security roles information.


Saturday, January 11, 2020

Life hack for the Business process modeler (BPM) creation in Lifecycle Services (LCS)

When you build BPM library from scratch, make sure you create Parent process that will include all child processes.

In this case, you will be able to export all the processes within one BPM-Requirement document.

BPM-Requirement document is being created using Doc button. Doc button that is available in the BPM generates MS Word document and includes highlighted process and all child processes of the highlighted process.


In this example, if user clicks Doc button then only "Develop Vision and Strategy" process and child processes of the "Develop Vision and Strategy" process will be exported to the document.

If this library had had the Parent process with the name, let's say "Process Frameworks", it would have exported all the processes presented on the picture at once. For the scenario above, users have to select each high-level process, click Docs and then manually combine all generated files into 1 document.

My recommendation is to have Parent/Main process in the BPM library since it will be easier to work and maintain such BPM  .

Friday, January 10, 2020

How to enable the Revenue Recognition Module in Dynamics 365 for Finance and Operations

The Revenue recognition module that is available in Microsoft Dynamics 365 Finance 10.0.6. release (https://docs.microsoft.com/en-us/dynamics365/finance/get-started/whats-new-finance-10-0-6), switched off by default and can't be turned on through Feature management.

The Revenue recognition feature can be turned on through configuration keys. To enable it, follow the steps below:
1. Turn on the environment into maintenance mode
See the link for the details: https://dynamicsax-silverbullet.blogspot.com/2020/01/turn-maintenance-mode-on-and-off-in.html
2. Go to System administration > Setup > License configuration.
3. Expand General ledger node.
4. Find the Revenue recognition module option.
5. Set the Revenue recognition module option to YES.
6. Reload the page and Revenue recognition module should be accessible on the environment.

Thursday, January 9, 2020

Turn maintenance mode on and off in DevTest environment in Finance and Operations

If you need to enable/disable configuration keys, you will go to System administration> Setup> License configuration

You might see the following message:

This form is read-only unless the system is in the maintenance mode. Maintenance mode can be enabled in this environment by running maintenance job from LCS, or using Deployment.Setup tool locally

To turn the environment on to maintenance mode follow the steps below:
1. Establish an RDP connection to the developer machine
2. Run the command:

Command to turn maintenance mode on
K:\AosService\PackagesLocalDirectory\Bin\Microsoft.Dynamics.AX.Deployment.Setup.exe --metadatadir K:\AosService\PackagesLocalDirectory --bindir K:\AosService\PackagesLocalDirectory\Bin --sqlserver . --sqldatabase axdb --sqluser axdbadmin --sqlpwd ********* --setupmode maintenancemode --isinmaintenancemode true

where ********* - SQL Server password that you can find in the LCS (see below)
  • Log in to LCS.
  • Go to Environment details page
  • Find DOMAIN ACCOUNTS section
  • Take the Password value for the axdbadmin User name and use this password in the command above
Command to reset IIS
Iisreset

Now you can enable/disable configuration keys as required.

To turn the environment off to maintenance mode follow the steps below:
1. Establish an RDP connection to the developer machine
2. Run the command:

Command to turn maintenance mode off:
K:\AosService\PackagesLocalDirectory\Bin\Microsoft.Dynamics.AX.Deployment.Setup.exe --metadatadir K:\AosService\PackagesLocalDirectory --bindir K:\AosService\PackagesLocalDirectory\Bin --sqlserver . --sqldatabase axdb --sqluser axdbadmin --sqlpwd ********* --setupmode maintenancemode --isinmaintenancemode false

where ********* - SQL Server password that you can find in the LCS (as described above)

Command to reset IIS
Iisreset

Wednesday, January 8, 2020

Use 1-Click Child-Links Azure DevOps extension to create predefined list of tasks


Use this extension to quickly add the same number of tasks to your work item within Azure DevOps project. For instance, you have many PBIs and all of them have the same tasks like Development, Testing, Code review etc.
If you don't want to enter such tasks every time when you create a new PBI, you can use this extension.

To install this extension, follow the link - https://marketplace.visualstudio.com/items?itemName=ruifig.vsts-work-item-one-click-child-links

Click Get it free button.
Select Azure DevOps organization from the drop-down list.
Click Install button.
Wait until you receive "You are all set" message.

Open Azure DevOps site.
Go to Project Settings.
Expand Boards and choose Team configuration.
Then, choose Templates.
Build up your own template with the tasks that you will be adding by 1-Click Child-Links extension.

Go to any Product backlog item to which you want to add tasks.
Click ... actions icon to open the menu.
Select 1-Click Child-Links option.
All tasks created in the template will be added as Child links to the selected Product backlog item.


Tuesday, January 7, 2020

Quickly assign System administrator role to MSDyn365FO user

In order to perform common actions with speed, use this blog post that will help you speed up SysAdmin role assignment process. Instead of searching System administrator role in the user roles section of the Assign roles to user form, you can quickly type in ‘admin’ value in the ID field and click OK (or Enter on the keyboard).