Tuesday, February 6, 2024

Safety stock journals: calculation logic in Microsoft Dynamics 365 SCM

Imagine you have a store and you need to make sure you never run out of popular items, like bread or milk. Safety stock is like having a backup supply just in case more people buy than expected, or if your supplier takes longer to deliver.

In Microsoft Dynamics 365 SCM, there's a tool called the Safety Stock Journal. It looks at how much products you've sold in the past to figure out how much extra you should keep in stock. This helps you avoid running out of things customers want to buy.

The Safety Stock Journal helps you plan how much extra stuff to keep based on what you've sold before. It's like using past sales to predict future needs, so you always have enough on hand.

In my scenario I have been selling cement product for past year and I had 16 lb set as a minimum inventory level. Now, I want to see if I need to adjust this level based my issue history statistics.

For this functionality, we will need to consider a few settings:

Purchase lead time (in my scenario I have set it up on the default order settings, but you can overwrite it on the item coverage). I have 4 days set as lead time.


Minimum inventory quantity. I have 16 pounds. 

Historical issue statistic. Let's see what I have in the inventory transactions:


In our scenario, we are interested in issues transactions which are Sold or Deducted

Now it is time to see what system can propose and whether we need to update our existing level of 16 pounds. 

Walkthrough: 

1. Go to Master planning > Master planning > Run > Safety stock calculation.
2. On  the Action Pane, select New
3. On the Journal header details FastTab, select the safety stock journal name.
4. On the Journal lines FastTab, select Create lines.
5. Select the date range:
From date – Select the start date of the period that issues should be included in the calculation for.
To date – Select the end date of the period that issues should be included in this calculation for. There must be at least two months between the start and end dates. 

In our scenario we have selected 12 months date range. It is important to notice the number of month you selected here, since it will be used in the calculations later. If you select less than 3 month period, the calculation of new minimum will not be meaningful.

6. Select the product you want to include into calculation

7. Select parameter “Calculate standard deviation” to calculate the standard deviation and get an indication how variable your historic demand has been.

Once you select OK on the dialog, the system will create a line and calculate some important statistic. 


Let's review how the system came up with these numbers. 

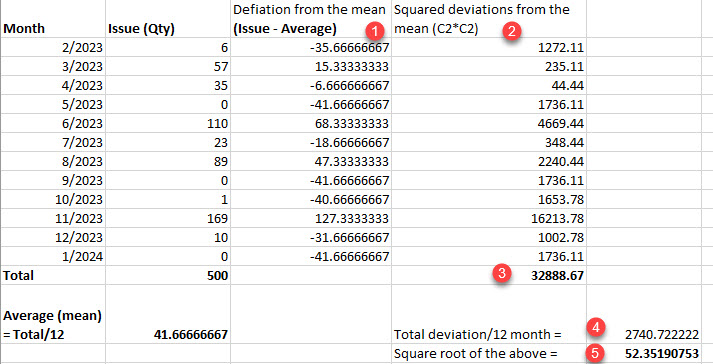
Average issues per month = Total of issues divided by defined period. In our case, sum of all issues for 12 months = 500 and then 500/12 month period = 41.67


Standard deviation of issues per month indicates how average number of issues of an item per month are spread out from the average. A low standard deviation means that most of the numbers are very close to the average. A high standard deviation means that the numbers are spread out around the average.

Standard deviation is calculated by the following formula (you can find some examples here: https://www.scribbr.com/statistics/standard-deviation/): 

Let's calculate our deviation: 


You can also check \Classes\ReqItemJournalCreate\calcStdDeviationPerMonth

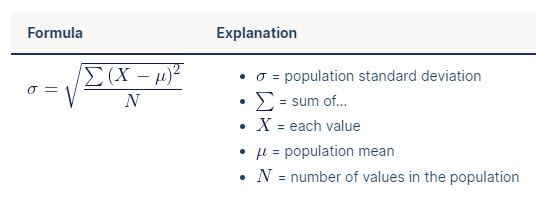
This method is calculating the standard deviation per month and populating StdDeviationIssueMonth field on Safety stock journal.

Average issue per lead time indicates the number of stock that we need to carry out through the lead time.
Important note here. Depends on whether you set Working days parameter for your lead time or not, calculation will be different. 

If  Working days = NO, Average issue per lead time calculation is the following:

Number of days in a month (30 days - hardcoded) divided by lead time. In our scenario 30 days needs to be divided by 4 days lead time. Then Average issue per month divide by the calculated value.


If  Working days = YES, Average issue per lead time calculation is the following:

We cannot take the full month of 30 days, because there are some weekends. So, instead of 30 days, we should take 5/7ths (30 / 7 * 5) = 21.4286 days (hardcoded value).

Number of days in a month 21.4286) divided by lead time. In our scenario 21.4286 days needs to be divided by 4 days lead time. Then Average issue per month divide by the calculated value. 


In my scenario, to validate it, I went back on the item and updated Working days to YES and I had to create the line from scratch to consider this new parameter. 


Now we know how these 3 fields are calculated. 
Let's see what will the system  propose as a new minimum level. 

On the Journal lines FastTab, select Calculate proposal.

You have to choose the method from 2 which are available:
  • Use average issue during lead time. Calculated minimum quantity values based on the average issue during the specified period.
  • Use service level. Calculated minimum quantity values based on the desired service level
Use average issue during lead time. This is the most commonly used. 

Multiplication factor. You can set this factor if you see for example hurricane is coming and you expect more demand so that you will require to carry more stock. For example, enter 1.0 to use the exact calculated average or 1.1 to add an extra buffer of 10 percent.

Lead time margin – Enter a value to extend the normal lead time by (for example, to allow for administration).

When you select this method the calculation will be the following.

If Working days parameter set to NO.

If Multiplication factor is set then the result is multiplied by multiplication factor. In our case it was set to 10. 

Use service level.

When you select this method the calculation will be the following.

In order to understand the service levels you need to see the hard coded safety factors – these are in the code and are considered standard factors associated with % service levels.


So the formula will be the following:


If we select the service level of 98, the safety factor will be different:


As soon as you ready, you can set new minimum quantity field and select Post button. This will update minimum field in the item coverage. 

That's it for today.

Sunday, September 10, 2023

Confirmation for serial numbers is now supported in 10.0.37 Microsoft Dynamics 365 SCM

In this blogpost I am going to walk through the new feature released in 10.0.37 Microsoft Dynamics 365 Supply Chain Management.

Before this feature is introduced, it was possible to confirm only batch numbers for the products where batch number is above the locations in the reservation hierarchy. This functionality was not available for serial numbers.

Batch and license plate confirmation - Supply Chain Management | Dynamics 365 | Microsoft Learn

For many organizations, especially for the manufacturing processes, it is highly important that picker picks the right product. Without this feature picker might take a different serial number then the one specified in the work line and he didn't have a way to confirm the serial number that was reserved for the picking work.

In 10.0.37 a new configuration was introduced: 

  • Go to Warehouse management > Setup > Mobile device > Mobile device menu items 
  • Select Sales picking mobile device menu item
  • Select Work confirmation button
  • Serial confirmation parameter is displayed.


Limitations and considerations:

  • Serial confirmation is supported only for serial above items
  • It is not supported for piece by piece picking

Now let's walk through the example. 

First of all, we need to created Serial above reservation hierarchy

  • Go to Warehouse management > Setup > Inventory > Reservation hierarchy
  • Create a new one and select serial number above the location.


Then let's create a product with enabled serial number tracking dimension and serial above reservation hierarchy. 

We also will need on-hand for this product. I am going to add 3 ea for 3 different serial numbers S1, S2 and S3


It is time to create a sales order. 
Create sales order with product.
Reserve inventory and release to warehouse.

You will notice that work is created


As you can see, the system is reserving S1 serial number, so worker will be guided to pick up this specific serial number.


Let's now log in to the mobile device and do the picking.
I will start by navigation to Work list to see all open works.
Select the work with the serialized product created previously. 
System will ask to scan the License plate. 

Now the system asks to confirm serial number. This step is displayed because we activated new configuration - Serial confirmation on the mobile device menu item. 

If you scan a serial number that doesn't match to the serial number on the work line - you will get an error message. 

If it matches, the next step to scan target LP will be displayed. 
And the rest steps are typical for the picking process and not related to the new feature. 
Confirm the put step.

Once you confirm - work completed message will be displayed

That's it!


Friday, September 8, 2023

Automatic re-waving process has been introduced in 10.0.37 SCM

In this blogpost I am going to walk through new feature that has been introduced in 10.0.37. This feature allows users  to configure automatic re-waving process that will process shipment lines that did not complete during processing of waves. It eventually will be removing any manual human involvement.

Why it is important? 

It is very common situation when wave lines fail due to multiple reasons. It can be because of lack of on-hand inventory in picking locations, some item attributes issues and many other. There are might be other reasons of why shipments lines do not complete waving. They are:

  • Production is delayed and did not report inventory as finished, waves cannot allocate inventory.
  • Goods are in quarantine and not available
  • Goods are still on inbound bay and not available on picking locations

When this happens, users typically need to manually handle such situations. They have to manually add lines to the new wave and process it. 

With this feature, this process is now automated. There is a new batch job has been introduced that will make your life easier meaning that if the lines didn't complete wave process then the failed line will be automatically assigned to the same wave template and re-waved without human involvement. 

Now let's deep dive into the feature.

We will start with simulating failure of waving process:

I am going to create sales order for the product for which I have on-hand inventory in RECV location, but not in the Picking location. Let's assume customer ordered 2 ea, and I have 10 ea available on-hand in RECV location.

Reservation will be done successfully, but wave allocation will fail. 

As soon as I release this order, the following will be done:

  • Load will be created
  • Shipment will be created
  • Wave will be created
  • Shipment will be added to wave
  • Wave allocation will fail
  • Shipment will be removed from wave

The result of the release:


And here a new logic kicks in. 

When wave fails, a record will be created in the new table WHSWaveProcessingRemovedShipment with the RewaveCount


You can review the data using table browser:
/?mi=SysTableBrowser&tablename=WHSWaveProcessingRemovedShipment&cmp=USMF

Now, you can run new batch job introduced to pick up failed shipments and create new waves and try to process wave with included failed shipments again. 

Go to Warehouse management > Outbound waves > Auto add shipments to wave

Here you see how many times process the failed shipment will be repeated. In our case it is set to 5 times. Batch job will pick up all shipments where Rewave counter is less or equal to the Rewave counter set in the batch job parameters, 


Since for our scenario, we have not changed anything, wave processing will fail again. Rewave counter in this scenario will be increased. It means that we tried to process that shipment via batch job 1 time.


Let's add on-hand to the bulk location and run Auto add shipments to wave again. 

Now the new wave will be created, shipments are added and wave is successfully process. Data related to that shipment will be removed from the WHSWaveProcessingRemovedShipment table. 

Some additional details:

If The failed Shipment is removed, it will be removed from this WHSWaveProcessingRemovedShipment log table. 

That's it!

Synchronize updates of the Requested ship and receipt dates on intercompany sales and purchase order lines.

In this blog post, I would like to talk through the intercompany feature that has been introduced in 10.0.37 release. 

Feature name: Synchronize updates of the Requested ship and receipt dates on intercompany sales and purchase order lines
Feature summary: This feature lets you control whether the requested ship and receipt dates are synchronized across intercompany sales and purchase order lines.
It adds new settings to both the "Purchase order policies" and "Sales order policies" tabs of the "Intercompany" setup page for customers and vendors.

I am going to use a few abbreviations throw-out the article. It means the following:  

IC PO - Intercompany Purchase order

IC SO - Intercompany Sales order

When this feature is disabled, then requested dates are synchronized in the intercompany flow.

For instance, you create IC PO and IC SO will be created automatically. When you update Requested receipt date on the IC PO, Requested ship date will be updated on the IC SO. The same happens in opposite scenario: you create IC SO and IC PO will be created automatically. When you update Requested ship date on the IC SO, Requested receipt date will be updated on the IC PO. 

When this feature is enabled, a new parameters will be displayed:

  • Go to Accounts payable > Vendors > All vendors
  • Select General tab on the Action pane
  • Select Intercompany in the Set p section


On the Purchase order policies and Sales order policies, you will notice new parameter.

Name: Disable requested ship and receipt dates synchronization
Help text (Sales policy): Select the option to disable line-level synchronization of updates on Intercompany Sales order requested ship and receipt dates with Intercompany Purchase order requested ship and receipt dates.
Help text (Purchase policy): Select the option to disable line-level synchronization of updates on Intercompany Purchase order requested ship and receipt dates with Intercompany Sales order requested ship and receipt dates.

When parameters are disabled, nothing is changed. Requested dates synchronization will happen upon date changes on the line. 

When Disable requested ship and receipt dates synchronization is enabled only for purchase order policies, then when you update Requested receipt date on the IC PO, requested ship dates will not be updated on the IC SO. But IC PO dates will still be updated if you change requested ship dates on the IC SO, since Sales order policy parameter was not enabled. 

When you enable this parameter for both policies (Sales, Purchase) then no matter where you update the dates, it will not be synchronized. 

That's it!

Tuesday, August 8, 2023

List of available variables in the Label layout SCM

If you ever tried to set up Container label layout, for example, you might wonder what is the list of available variables. When you follow the guide, Container label layouts and printing - Supply Chain Management | Dynamics 365 | Microsoft Learn, there are some variables available, like RowPerLabel etc. 

In his blogpost, I going to provide the list of them and what those mean. 

  • position.rowNumber. This variable represents a row on a current label
  • position.globalRowNumberThis variable represents a row over multiple labels
  • position.labelNumberThis variable represents a current label number
  • position.labelCountThis variable represents a total number of labels created
  • position.YPos. This variable represents =StartY + rowNumber * IncY

Unfortunately, there are no such variables as position.rowCount (and/or position.globalRowCount) which can be used for the number of rows that get printed on a label. For instance, if RowsPerLabel=10 but there are only 4 rows in a record, and you want to print 4 on the label. 
The reason why it is not available it is because it would affect the performance, as you will not know the number of rows until you finish with the label and you have to go back and process the same label twice.

That's it!

Monday, August 7, 2023

Create Transfer orders from a Warehouse management app in SCM

In this blog post we are going through the Create transfer orders from a mobile device feature and see how it works.

MOBILE DEVICE MENU ITEMS SETUP

Follow these steps to create the mobile device menu item for the transfer order creation.
  • Navigate to: Warehouse management > Setup > Mobile device > Mobile device menu items.
  • Create a new mobile device menu item by selecting “New” on the action pane.
  • Enter a menu name: “Create TO”.
  • Mode: Indirect.
  • Activity Code: Create transfer order from license plates.
  • Transfer order line creation policy: License plate guided with line reservation.
  • Outbound shipment policy: Release and ship confirm. This will release a transfer order to the warehouse and confirm the shipment. 

MOBILE DEVICE MENU SETUP

Follow these steps to add the created mobile device menu item to the Inventory menu.

  • Navigate to: Warehouse management > Setup > Mobile device > Mobile device menu
  • Select the Inventory menu and move the menu item from the available list to the menu structure. 


WORK TEMPLATES SETUP

When wave is released, we need to create a work. For this, work templates are used.  the work that is created when the wave is released. 
Follow these steps to setup work templates. 
  • Navigate to: Warehouse management > Setup > Work > Work templates.
  • Select Transfer issue work order type.
  • Select “New” to create a new work template:
  • Sequence Number: 0.
  • Work Template: “51 AutoProcess LP”.
  • Work Template description: “51 AutoProcess LP”.
  • Automatically process: Yes.
  • Create work template lines in the Work template details section. 
  • Work type: Pick
  • Work class ID: TransfOut
  • Add a second line and select:
  • Work Type: Put.
  • Directive code: Baydoor.
  • Work class ID: TransfOut.


  • Select “Edit query” on the action pane.
  • Open the Range tab. Select "Add" and for the created line in the "Field" select Warehouse, in the "Criteria" select 51.
  • Open the Sorting tab. Select "Add" and for the created line in the "Field" select Located license plate ID, in the "Search direction" select Ascending.
  • Select OK. 
  • Select "Work header breaks" in the work template page and then select the “Group by this field” check box.

LOCATION DIRECTIVES SETUP

Follow these steps to create location directive.
  • Navigate to: Warehouse management > Setup > Location directives.
  • Select "Transfer issue" work order type” .
  • Create new location directive.
  • Sequence: 1.
  • Name: 51 TO LP Guided.
  • Wort type: Pick.
  • Warehouse selection: Warehouse and Warehouse 51.
  • In the “Lines” fasttab create a new line.
  • To quantity: 999999.
  • Allow split: Yes (Note: Allow split must be enabled for the License plate guided strategy).
  • In the “Location directive actions” create a new line.
  • Name: LP Guided.
  • Strategy: License plate guided .

SET UP BATCH JOB TO PROCESS WAREHOUSE APP EVENTS 

Follow these steps to set up a batch job to process warehouse app events.

  • Navigate to: Warehouse management > Periodic tasks > Process warehouse app events.
  • Expand “Run in Background” FastTab.
  • Set “Batch Processing” to “Yes”.
  • Select “Recurrence”  and select the desired recurrence.
  • Select “OK” to return to the “Process warehouse app events” page.
  • Select “OK” to add the batch job to the batch queue.

SET UP BATCH JOB TO RELEASE TRANSFER ORDERS AUTOMATICALLY

Follow these steps to set up a batch job to release transfer orders automatically once transfer orders are created by process warehouse app events.

  • Navigate to: Warehouse management > Release to warehouse > Automatic release of transfer orders.
  • Expand "Records to include" section and select "Filter". 
  • Select Filter under the Records to include section.
  • On the Range tab, select Add to add a new line to the query.
    • Table field: Transfer line release to warehouse.
    • Field field:  Outbound shipment policy.
    • Criteria field: Release and ship confirm.
    • For the From warehouse, in the Criteria field, select 51.


  • Select OK to return to the main dialog box.
  • Expand Run in the background section and enable Batch processing.
  • Select Recurrence and set up the batch job to process based on interval needed for your business.
  • Select "OK" to return to the main dialog.
  • Select "OK "in the main dialog to have the batch job added to the batch queue.

SET UP BATCH JOB TO PROCESS OUTBOUND SHIPMENT

Follow these steps to set up a scheduled batch job to run the outbound shipment confirmation for loads ready to ship related to transfer order lines that are "ready to ship".

  • Navigate to: Warehouse management > Periodic tasks > Process outbound shipments.
  • Expand "Records to include" section and select "Filter". 
  • Select "Joins" tab.
  • Expand Loads and Load details from the table hierarchy.
  • Select "Load details" table and select "Add table join" button.
  • Search for n:1 Transfer order lines (Reference) and press the Select button.
  • Select "Transfer order lines" table and select the "Add table join" button.
  • Search on the Relation column for 1:n Invent Transfer Additional Fields (Record-ID) and press the Select button.


  • Select the Range tab and select the Add button.
  • Add a range for the table Loads. Set Field to Load status and set Criteria to Loaded.
  • Add a range for the table Invent Transfer Additional Fields. Set Field to Outbound shipment policy and set Criteria to Release and ship confirm.
  • Add a range for the table Load details. Set Field to Reference and set Criteria to Transfer order shipment.
  • Select "OK" to return to the main dialog box.
  • Expand "Run in the background" section and enable Batch processing.
  • Select "Recurrence" and set up the batch job to process based on interval needed for your business.
  • Select "OK" to return to the main dialog.
  • Select "OK" in the main dialog to have the batch job added to the batch queue.


ADD ON-HAND ON A LICENSE PLATE

CREATE AND PROCESS TRANFER ORDERS FROM TEH WAREHOUSE APP 

  • Open the app and sign in as user 51. 
  • Select the menu item Create TO in the Inventory menu.
  • Enter the destination warehouse (To warehouse) in the Warehouse field, enter 61. The new transfer order will be going from current warehouse 51 (From warehouse) to the destination warehouse 61.
  • Notice that Transfer order number is allocated already from the number sequence.
  • Scan a license plate ID in the License plate field. Enter the license plate of the inventory added in an earlier step, LP10.
  • Once LP is scanned, License plate count will be updated accordingly. 


  • Scan a license plate ID in the License plate field. Enter the license plate of the inventory added in an earlier step, LP20.

  • As soon as LP scan is done,  Warehouse app event is being created. Since we scanned 2 LPs, you will notice 2 warehouse app events being created. 
    • Navigate to: Warehouse management > Inquiries and reports > Mobile device logs > Warehouse app events. 

  • Go back to the mobile device and select Complete order to finalize the warehouse app transfer order creation.
  •  As soon as Complete order is done,  Warehouse app event for the transfer complete is being created. All warehouse app events will be changed from "Waiting" to "Queued" event state. 

  • Now, the Process warehouse app events batch job will pick up the queued events for the transfer order creation. 
  • As soon as those events are completed, transfer order will be created.


  • Notice that Outbound shipment policy is set to None. This will be updated as soon as the Complete transfer order warehouse app event will be updated to Completed. 
  • Once the Process warehouse app events batch job is executed and marked all events as Completed, they will disappear from the Warehouse app events page and transfer order lines will be updated based on the policy set on the mobile device menu item. 


  • Now this transfer order lines can be picked up by the Automatic release of transfer orders batch job. This will create the shipment, the load and the work. 
  • Since the work template is set to Automatically process, the work will be , and the work has been completed.

  • Finally, the “Process outbound shipment” batch job will confirm the shipment and change the load status to “Shipped”.