Thursday, February 27, 2020

Grouping in grids feature in Microsoft Dynamics 365 F&SCM

Within Platform Update 33 (PU33) Grouping in grids feature has been added. In order to activate this feature, navigate to the Feature management workspace, find Grouping in grids feature on the list of System administration module and click Enable now button. Once you activate it, you can use grouping in grids capabilities.

This feature, which requires the new grid control to also be enabled, allows users to group data within grids. This empowers users to analyze data and calculate subtotals per group. Grouping can be saved as part of the saved view definition when the saved views feature is enabled.

For more details, visit this page - https://docs.microsoft.com/en-us/business-applications-release-notes/April19/dynamics365-finance-operations/grid-experience

With this new feature you can do the following:
1. In any grid decide by which field you would like to group your data.
2. Right click on that field and select Group by this column.
3. Grid will be presented in the grouped way by the column that you've set. In the example below, the grouping by Customer account on the Open customer invoice grid has been made.
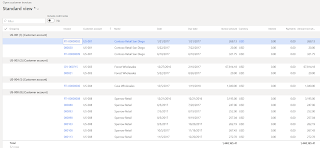
Unfortunately, Totals are displayed for the whole grid and not per grouped field. In our case it doesn't make much sense, since there can be multiple currencies and the totals in this case are not correct.

New grid control in Microsoft Dynamics 365 F&SCM

Within Platform Update 33 (PU33) New grid control feature has been added. In order to activate this feature, navigate to the Feature management workspace, find New grid control feature on the list of System administration module and click Enable now button. Once you activate it, you can use new grid capabilities.

This feature replaces the existing grid control with a new control that has faster rendering, smoother scrolling, and less jumping when navigating in the grid. The new grid also allows drag-and-drop column reordering, entry of mathematical expressions in numeric cells, the ability to calculate totals at the bottom of numeric columns, and the ability to get ahead of the system when editing or creating data.

For more details, visit this page - https://docs.microsoft.com/ru-ru/dynamics365-release-plan/2019wave2/finance-operations-crossapp-capabilities/user-productivity-new-grid

With this new feature you can do the following:
1 - move/reorder columns by dragging them
2 - add columns through context menu
3 - add/hide footer to display totals for any integer/decimal columns
4 - hide columns through context menu
5-  use mathematical formulas in the numeric fields
6,7,8,9 - review totals in the footer section


Create Saved views and share with the users in Microsoft Dynamics 365 F&SCM

Within Platform Update 33 (PU33) new Saved views feature has been added. In order to activate this feature, navigate to the Feature management workspace, find Saved views feature on the list of System administration module and click Enable now button. Once you activate it, you can configure personalized view of the form.
This feature allows users to have multiple named sets of personalizations per page. Views can also be published to security roles.
For more details, visit this page - https://docs.microsoft.com/en-us/business-applications-release-notes/April19/dynamics365-finance-operations/saved-views
To create a new view of the form, navigate to any form that you would like to personalize.
Under the name of the form, you will notice "My view" option. Click arrow down and select Save as. This will trigger new view creation.
Provide a new name for the view.
After that, using Personalize this page button on the Options tab, make any changes that you would like (Add fields, hide fields, move fields etc)
Once you are done with personalization, you will need to save it. You will notice that it's unsaved view through asterisk. Click Save option and modified view will be saved.

If you need to share created view, you can click three dots icon and select Publish option.

In the opened form, you will have to specify the security role with whom you would like to share the view.
In a nutshell, this feature allows you to  create optimized views of a form that might speed up the process, simplify the user experience, and improve user productivity.

How quickly navigate to the List Page from Details form in Microsoft Dynamics 365 F&SCM

Have you ever noticed the link that is available at the top of the Details form? Let's say, Released product form (Product information management > Products > Released products).
If you click on any item, you will be drilled down into details of the selected product. If you need quickly go back into List page, you can easily click on the link, instead of clicking Close button (or Esc button on your keyboard).


Friday, February 21, 2020

Utilize ability to configure Dynamics 365 Finance and Operations - Warehousing app for multiple environments

Did you know that you can connect Dynamics 365 Finance and Operations - Warehousing app to multiple instances?
You could use it if you build your own solution and you need to test the developed solution in several environments, like Test environment, UAT etc.
In the Dynamics 365 Finance and Operations - Warehousing app there is an option to do so.

Open Dynamics 365 Finance and Operations - Warehousing app
Open hamburger menu and chose Settings
In the Connection settings window, Click on the drop-down list in the Select connection field.

In the Select connection window, click on the hamburger menu.

In the Action window, select New connection option.


 In the Add connection window, fill in required information.


Once you save it, you will be able to select environment in the Connection settings window, to which you would like to connect.

Thursday, February 20, 2020

Product identifier not found while barcode scanning in the Dynamics 365 Finance and Operations - Warehousing

If you experience an issue with the barcode scanning in the Dynamics 365 Finance and Operations - Warehousing and see an error message the Product identifier not found as presented below
You must have forgotten to turn on the Scanning flag on the barcode itself for that item.

Go to Product information management > Products > Released products > Manage inventory tab on the Action pane > Bar codes button in the Warehouse section

Switch to the General tab for the selected bar code and switch on Scanning flag.


Wednesday, February 19, 2020

Tips for Planning optimization in Microsoft Dynamics 365 for Finance and Operations

With new Planning optimization in Microsoft Dynamics 365 for Finance and Operations that will be available in the first half of the 2020, you would probably need to think about the following:

  1. Planning optimization service will be a black box. You will not be able to extend and customize calculations in the Planning optimization micro-service
  2. You would be able to customize the Pre-processing logic of the master data
  3. You would be able to customize the Post-processing logic of the master data
  4. Currently there are no extra charges announced for the improvement. Planning optimization is included in the current license. So, if you have an access to the Master planning functions (MRP), you will be able to get an access to the Planning optimization feature.
  5. Future additional planning functionality might come with additional charge.
  6. Planning is triggered add-hoc during office hours, but Planning optimization service can be cancelled while Planning is progress and no data corruptions occur. 
  7. Environment add-in needs to be installed through Dynamics Lifecycle Services (LCS) prior to using Planning optimization service.
  8. Standard planning capabilities (MRP) will be deprecated
  9. The sooner you start Planning optimization utilization (including testing, investigating different scenarios), the sooner you will find out all possible gaps for the real-time Planning optimization utilization.