Thursday, March 26, 2020

Turn on new Small parcel shipping (SPS) feature in Microsoft Dynamics 365 F&SCM

Within 10.0.9 Application release, Platform Update 33 (PU33) Small parcel shipping (SPS) feature has been added. In order to activate this feature you would need to complete the following steps:
  1. Insert Flight name (aka Feature name) into SYSFLIGHTING
  2. Restart IIS
  3. Check for updates in the Feature management 
  4. Enable Small parcel shipping (SPS) in the Feature management 
Step 1:  Insert Flight name into SYSFLIGHTING

Open SQL Server Management Studio as Administrator and execute the following SQL statement to insert the TMSSmallParcelShippingFeature flight into the SYSFLIGHTING table.

insert into dbo.SYSFLIGHTING(FLIGHTNAME, ENABLED, FLIGHTSERVICEID) values ('TMSSmallParcelShippingFeature', 1, 12719367)

Step 2: Restart IIS

Open command-line(cmd) as System administrator and at the command prompt, type:

iisreset

Step 3:  Check for updates in the Feature management

Navigate to System administration > Workspaces > Feature management 
Click Check for updates button

Step 4:  Enable Small parcel shipping (SPS) in the Feature management 

Find Small Parcel Shipping feature within Transportation management module and click Enable button.

Friday, March 6, 2020

Due date alerts batch job is not working in Microsoft Dynamics 365 F&SCM (Platform update 31)

With the Platform update 31, Platform update 32, you may experience the issue with Due date alerts batch job (System administration > Periodic tasks > Alerts > Due date alerts).

In general, Due date alerts batch job is in Executing status but does nothing, it just gets stacked.

The result of this is that Microsoft Dynamics 365 Unified Operations: Batch Management Service service is terminating unexpectedly and restarting every 2 mins.

Having investigated Due date alert batch job, the root cause was found. The system fails here:


As a workaround in order to fix it, you could set 2 weeks for the Alert rule instead of “is due in 1 calendar day”.

I do know that it’s quite an odd solution if you are using Due date alerts constantly.

The good news is that Microsoft released a hotfix already for this issue.

Platform 31 - KB 4537849 Stack overflow caused by recursion 
https://fix.lcs.dynamics.com/Issue/Details/1277393?kb=4537849&bugId=408330&dbType=3&qc=1efe704342b29b568e9306fead37964410dd0958d71da87fbcb070612a53c21b

Platform 32 - KB 4537705 Stack overflow caused by recursion
https://fix.lcs.dynamics.com/Issue/Details/1277393?kb=4537705&bugId=407923&dbType=3&qc=1efe704342b29b568e9306fead37964410dd0958d71da87fbcb070612a53c21b

You can use the link below to install these hotfixes: https://docs.microsoft.com/en-us/dynamics365/fin-ops-core/dev-itpro/migration-upgrade/download-hotfix-lcs


Thursday, February 27, 2020

Grouping in grids feature in Microsoft Dynamics 365 F&SCM

Within Platform Update 33 (PU33) Grouping in grids feature has been added. In order to activate this feature, navigate to the Feature management workspace, find Grouping in grids feature on the list of System administration module and click Enable now button. Once you activate it, you can use grouping in grids capabilities.

This feature, which requires the new grid control to also be enabled, allows users to group data within grids. This empowers users to analyze data and calculate subtotals per group. Grouping can be saved as part of the saved view definition when the saved views feature is enabled.

For more details, visit this page - https://docs.microsoft.com/en-us/business-applications-release-notes/April19/dynamics365-finance-operations/grid-experience

With this new feature you can do the following:
1. In any grid decide by which field you would like to group your data.
2. Right click on that field and select Group by this column.
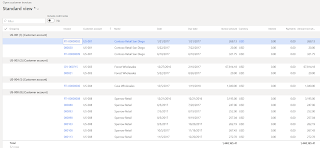
3. Grid will be presented in the grouped way by the column that you've set. In the example below, the grouping by Customer account on the Open customer invoice grid has been made.
Unfortunately, Totals are displayed for the whole grid and not per grouped field. In our case it doesn't make much sense, since there can be multiple currencies and the totals in this case are not correct.

New grid control in Microsoft Dynamics 365 F&SCM

Within Platform Update 33 (PU33) New grid control feature has been added. In order to activate this feature, navigate to the Feature management workspace, find New grid control feature on the list of System administration module and click Enable now button. Once you activate it, you can use new grid capabilities.

This feature replaces the existing grid control with a new control that has faster rendering, smoother scrolling, and less jumping when navigating in the grid. The new grid also allows drag-and-drop column reordering, entry of mathematical expressions in numeric cells, the ability to calculate totals at the bottom of numeric columns, and the ability to get ahead of the system when editing or creating data.

For more details, visit this page - https://docs.microsoft.com/ru-ru/dynamics365-release-plan/2019wave2/finance-operations-crossapp-capabilities/user-productivity-new-grid

With this new feature you can do the following:
1 - move/reorder columns by dragging them
2 - add columns through context menu
3 - add/hide footer to display totals for any integer/decimal columns
4 - hide columns through context menu
5-  use mathematical formulas in the numeric fields
6,7,8,9 - review totals in the footer section


Create Saved views and share with the users in Microsoft Dynamics 365 F&SCM

Within Platform Update 33 (PU33) new Saved views feature has been added. In order to activate this feature, navigate to the Feature management workspace, find Saved views feature on the list of System administration module and click Enable now button. Once you activate it, you can configure personalized view of the form.
This feature allows users to have multiple named sets of personalizations per page. Views can also be published to security roles.
For more details, visit this page - https://docs.microsoft.com/en-us/business-applications-release-notes/April19/dynamics365-finance-operations/saved-views
To create a new view of the form, navigate to any form that you would like to personalize.
Under the name of the form, you will notice "My view" option. Click arrow down and select Save as. This will trigger new view creation.
Provide a new name for the view.
After that, using Personalize this page button on the Options tab, make any changes that you would like (Add fields, hide fields, move fields etc)
Once you are done with personalization, you will need to save it. You will notice that it's unsaved view through asterisk. Click Save option and modified view will be saved.

If you need to share created view, you can click three dots icon and select Publish option.

In the opened form, you will have to specify the security role with whom you would like to share the view.
In a nutshell, this feature allows you to  create optimized views of a form that might speed up the process, simplify the user experience, and improve user productivity.

How quickly navigate to the List Page from Details form in Microsoft Dynamics 365 F&SCM

Have you ever noticed the link that is available at the top of the Details form? Let's say, Released product form (Product information management > Products > Released products).
If you click on any item, you will be drilled down into details of the selected product. If you need quickly go back into List page, you can easily click on the link, instead of clicking Close button (or Esc button on your keyboard).


Friday, February 21, 2020

Utilize ability to configure Dynamics 365 Finance and Operations - Warehousing app for multiple environments

Did you know that you can connect Dynamics 365 Finance and Operations - Warehousing app to multiple instances?
You could use it if you build your own solution and you need to test the developed solution in several environments, like Test environment, UAT etc.
In the Dynamics 365 Finance and Operations - Warehousing app there is an option to do so.

Open Dynamics 365 Finance and Operations - Warehousing app
Open hamburger menu and chose Settings
In the Connection settings window, Click on the drop-down list in the Select connection field.

In the Select connection window, click on the hamburger menu.

In the Action window, select New connection option.


 In the Add connection window, fill in required information.


Once you save it, you will be able to select environment in the Connection settings window, to which you would like to connect.