Custom label layout type feature that has been released in 10.0.33 allows you to print any labels for any tables. It is a beneficial especially in the retail industry, for food and beverage customers .
With this feature you can print the following at the minimum:
- Item labels
- Item barcode labels
- Customer labels
- Vendors labels
- Locations
- Fixed locations for items
- On hand
- LPs
- Container Ids
In this blogpost, I will go through some of the example above.
Let's start with printing locations.
Print locations
1. Set up Label layout data source
Go to Warehouse management > Setup > Document routing > Label layout data source.
Select New and set the following values:
- Label layout data source ID: Locations.
- Description: Locations.
- Label layout type: Custom label.
- Custom label root table: WMSLocation.
2. Set up Custom label layout
Go to Warehouse management > Setup > Document routing > Label layout.
Set the Label layout type field to Custom Label.
Select New and set the following values:.
- Label layout ID: Locations.
- Description: Locations.
- Label layout data source ID: Locations.
On the Printer text Layout FastTab, enter the ZPL code below.
CT~~CD,~CC^~CT~^XA~TA000~JSN^LT0^MNM,0^MTT^PON^PMN^LH0,0^JMA^PR8,8~SD15^JUS^LRN^CI27^PA0,1,1,0^XZ^XA^MMT^PW831^LL609^LS0^FT40,59^A0N,28,28^FH\^CI28^FDLocation^FS^CI27^FT19,148^A0N,42,43^FH\^CI28^FDLocationID: ^FS^CI27^FT230,148^A0N,42,43^FH\^CI28^FD$WMSLocation_1.wMSLocationId$ ^FS^CI27^BY3,3,180^FT116,525^BCN,,Y,N^FH\^FD^FS^PQ1,0,1,Y^XZ
3. Set up Warehouse management parameters
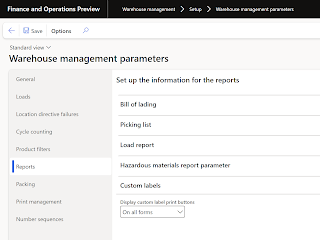
Go to Warehouse management > Setup > Warehouse management parameters.
On the Reports tab, on the Custom labels FastTab, set the Display custom label print buttons option to On all forms.
4. Printer setup
Go to Organization administration > Setup > Network printersMake sure Printer is Active.
5. Print location label
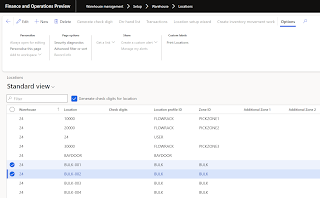
Go to Warehouse management > Setup > Warehouse > Locations.
Select one or more records.
On the Action pane, on the Options tab, in the Custom labels group, select Print locations.
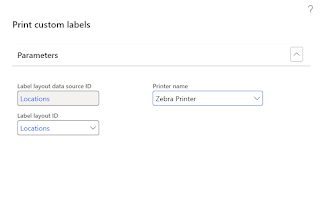
In the Print custom labels dialog box, set the following fields:
- Label layout ID: Locations.
- Printer name: Select the printer that you want to print from.
Notification will appear stating how many labels were sent to print.
And 2 labels will be printed.
If you want to have multiple labels for the same data source, you can also do it.
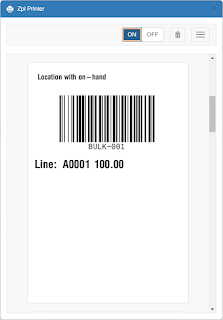
For instance, to the example above we would like to have different labels for the locations and locations with on-hand details from the locations. First label we have configured already. Now let's set it up the second label with on hand details:
Go to Warehouse management > Setup > Document routing > Label layout data source.
Select New and set the following values:
- Label layout data source ID: LocationsInventSum.
- Description: Locations (+InventSum).
- Label layout type: Custom label.
- Custom label root table: WMSLocation.
On the Action Pane, select Edit query.On the Joins tab, add the InventSum table through Inventory dimensions table.Select OK.
Go to Warehouse management > Setup > Document routing > Label layout.
Set the Label layout type field to Custom Label.
Select New and set the following values:.
- Label layout ID: LocationsInventSum.
- Description: Locations (+ InventSum).
- Label layout data source ID: LocationsInventSum.
On the Printer text Layout FastTab, enter the ZPL code below.
{{LabelStart
^FX ... ZPL commands that will be printed on every label ...
CT~~CD,~CC^~CT~
^XA
~TA000
~JSN
^LT0
^MNM,0
^MTT
^PON
^PMN
^LH0,0
^JMA
^PR8,8
~SD15
^JUS
^LRN
^CI27
^PA0,1,1,0
^XZ
^XA
^MMT
^PW831
^LL609
^LS0
}}
{{Header
^FT31,59^A0N,28,28^FH\^CI28^FDLocation with on-hand^FS^CI27
^BY3,3,180^FT116,300^BCN,,Y,N
^FH\^FD$WMSLocation_1.wMSLocationId$^FS
}}
{{Row Table=InventSum_1 StartY=400 IncY=68 RowsPerLabel=5
^FT19,$position.YPos$^A0N,42,43^FH\^CI28^FDLine:^FS^CI27
^FT128,$position.YPos$^A0N,42,43^FH\^CI28^FD$InventSum_1.ItemId$^FS^CI27
^FT250,$position.YPos$^A0N,42,43^FH\^CI28^FD$InventSum_1.AvailPhysical$^FS^CI27
}}
{{LabelEnd
^PQ1,0,1,Y
^XZ
}}
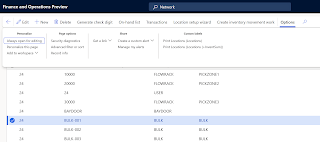
Go to Warehouse management > Setup > Warehouse > Locations.
Select one or more records.
On the Action pane, on the Options tab, in the Custom labels group you can see 2 buttons since we have multiple label data sources for the same root table
On the Action pane, on the Options tab, in the Custom labels group, select Print Locations (Locations (+ InventSum)).
In the Print custom labels dialog box, set the following fields:
- Label layout ID: LocationsInventSum.
- Printer name: Select the printer that you want to print from.
Label is then printed
That's it for today!


